Showing posts with label from. Show all posts
Showing posts with label from. Show all posts
Saturday, March 4, 2017
Willingness called by Circle office for adhoc promotion to PM Grade II cadre from among PM Grade I officials TN Circle
Willingness called by Circle office for adhoc promotion to PM Grade II cadre from among PM Grade I officials TN Circle


Available link for download

Monday, February 20, 2017
NEW! HOW TO COPY ALL POSTS FROM ONE BLOG TO ANOTHER
NEW! HOW TO COPY ALL POSTS FROM ONE BLOG TO ANOTHER
This article is about how to copy all the posts from one blog to another, using Blogger.
 |
| For Blogger Blogs Only |
To copy all the Posts from one blog to another, you need to export them from the first blog, and import the file that was created into the second file.
Any Pages in the first blog, need to be moved individually, because pages arent currently included in the export file.
If you want to totally replace the contents of the destination blog with the contents of the source blog, then you should delete the existing posts from the destination blog before you import the file. (NB Delete posts by going to the Posting / Edit Posts screen, and pressing the Delete button that is beside the post. Dont delete the entire blog, or you will lose access to the URL).
Follow these steps to copy all posts from one blog to another
1 Log in to Blogger.
2 Go to the export tab from the Settings / Other tab.
3 Click on Export Blog.
 |
| Export-blog window on the old Blogger interface: the new interface looks a little different, but has the same links |
3a If you are using the new interface, click Download Blog on the confirmation message window:

4 Your computer will download a file. For Windows users, it will probably be put in the My Documents / Downloads file. Or you system may use another place, or it may ask you where to put it. Whatever happens, you will need to know where this file is saved to.
5 Open the blog that you want to move the posts to
(You may need to log out and in again, or perhaps just switch to different browser or tab)
5 Delete (using Posting / Edit Posts) any Posts that are already there, but which you dont want in the refreshed blog.
6 Go to Settings > Other and click Import Blog. When the box opens, choose the exported file that you made earlier, and enter the security-text.
 |
| Import file selection screen in the new interface: the old version of Blogger is very similar. |
7 Choose whether or not to automatically publish all imported posts.
Only tick the box if you DO want the posts automatically imported. If you dont tick it, the posts will be loaded, but with have status of Draft, so wont be visible by readers until you publish them.
8 Click Import Blog.
9 Check that the import worked successfully, by looking at the blog, and also at the list of posts under Edit Posts: are the right number of posts there, do they have the right labels etc.
Results
All the posts from the source blog will be copied to the destination blog.
Many of the post characteristics will be the same as in the original blog.
This includes:
- title
- post contents
- published-date and time
- label(s)
- post-author.
Any comments from the source blog will also be copied over - sometimes it takes a few hours for the links for them to be re-establshed properly.
The URL for each post will be based on the URL of the blog you have imported them into and the publication-date that the posts had in the source blog - for example:
www.YourNewBlogName.blogspot.com/2017/13/name-based-on-post-title.html
Any internal links in the blog will still point to the post in the old blog
For example this link points to a popular article in SlausTec Blog
If I export-and-imported this post into a new blog, the link would still point to the same place, ie the post in SlausTec Tz1 - not to the post in the new blog.
Any pictures, videos etc in the old blog will still be in the same place that they were in (Picasa-web-albums, YouTube, Google Videos etc).
If you have imported more than the number of posts that Blogger allows per day (currently 50 I think) then to make any more posts today you will need to complete the captcha-test (ie entering the letters in the funny-shaped word). This will go away approximately 24 hours after you last enter more that the maximum-posts-per-day.
Importing to the same blog
If you try to import posts into the same blog that you exported them from, Blogger will not import any posts, and give you an error message.
If you do want to do this (eg to create a duplicate set of posts), then do the export, change some small detail of the original posts title or date/time, and then do the import.
Available link for download
Wednesday, February 15, 2017
Instructions from CPC CBS on Interoperable ATM in DOP
Instructions from CPC CBS on Interoperable ATM in DOP
Instructions from CPC(CBS) on Interoperable ATM in DOP

Dear All,
As you are aware DOP ATMs are interoperable, however still under observation for a week. As many ATMs were not online/kept open, patches pushed centrally by switch team could not be deployed in such ATM sites. Due to this non DOP ATM cards are not working in those ATM locations.
As per directorate orders all the DOP ATMs should be functioning and kept open 24X7. Hence, kindly instruct all the ATM site located SOLs to personally check the ATM screen by using other bank ATM cards and do some sample transactions. If the other bank cards are not functional in those ATMs please consolidate such ATM location details with ATM ID and SOLID for taking up the issue with respective vendor for early rectification by 02/01/2017 1100 hrs positively.
Thanks & regards,
Incharge Operations, DOP ATM Unit
CBS-CPC, 4th Floor, Bengaluru GPO Building
Bengaluru-560001
080-22850173, 18004252440
Bengaluru-560001
080-22850173, 18004252440
postatm@indiapost.gov.in
Note:
Previously, people with accounts in postal department can only use the services of the India Post ATMs.
Now Reserve Bank of India (RBI) has approved the India Posts proposal for interoperability of its ATMs with other banks.
Equipped with a wide network of core banking solution (CBS) branches, Pensioners and other savings bank account holders, including Monthly Income Scheme (MIS) account holders with the postal department need not hence-forth wait in long queues for withdrawal of cash. They could withdraw up to a maximum of Rs.10,000 at a time from any ATM in India with the ATM cards issued to them.
Now Reserve Bank of India (RBI) has approved the India Posts proposal for interoperability of its ATMs with other banks.
Equipped with a wide network of core banking solution (CBS) branches, Pensioners and other savings bank account holders, including Monthly Income Scheme (MIS) account holders with the postal department need not hence-forth wait in long queues for withdrawal of cash. They could withdraw up to a maximum of Rs.10,000 at a time from any ATM in India with the ATM cards issued to them.
Available link for download
Saturday, February 4, 2017
Will not accept Debit Credit cards from tonight say Petroleum dealers
Will not accept Debit Credit cards from tonight say Petroleum dealers

The petrol bunks across the country will stop accepting debit cards and credit cards for filling fuel from midnight on Sunday as banks will now debit a Merchant Discount Rate of 1 per cent from petroleum dealers, said President of All India Petroleum Dealers Association Ajay Bansal.
Talking to reporters after a two-day State-level convention of petroleum dealers here on Sunday, Mr. Bansal said each petroleum dealer was operating with a profit margin of 2 per cent.
On Saturday, banks referred to the Reserve Bank of India notification dated December 16 and said an MDR ranging between between 0.25 and 1 per cent will be deducted for each debit card transaction. An MDR of 1 per cent will be deducted for each credit card transaction.
“We are operating on a very thin margin. We cannot afford this deduction. Hence we have no other go than stop accepting debit and credit cards,” Mr. Bansal said. When pointed that the dealers are going against government directions, Mr. Bansal said they have no other option. Mr. Bansal said the decision to stop accepting debit and credit cards had been conveyed to Petroleum Ministry and Finance Ministry officials, he said.
Paytm and BHIM
Mr. Bansal said petroleum dealers will however accept payments through Paytm and Bhim apps. “But we have to stop accepting Paytm if they impose charge for each transaction,” he said. There are as many as 28,000 petrol bunks where Paytm was being accepted.
Mr. Bansal said the petroleum dealers are in favour of Central Government’s move towards cashless transactions. “But we cannot afford to pay from our margin. We want our profit margin (of 2 per cent) intact,” he said.
Available link for download
Thursday, January 26, 2017
How to Create Bootable Windows 8 USB Drive From ISO Image
How to Create Bootable Windows 8 USB Drive From ISO Image

But before this tutorial i want to tell you something that i have shared before How to Make Windows 8 Look Like Windows 7 On Your PC.
And before this i have already shared tutorial on How to Install Windows 8 From USB Flash Drive but some people not like this because it was lengthy and also without screen shots, but now in this tutorial i am giving screen shots for your help.
Step By Step to Create Windows Bootable USB Drive
Note: We must have the Windows files which we have to install to the USB drive.
Step: 1-Install PowerISO. If you don’t have you can download it from here.

Step: 2- To make a bootable Pen drive… Run PowerISO >> click on Tools >> Create Bootable USB Drive. Check Screenshot For help.
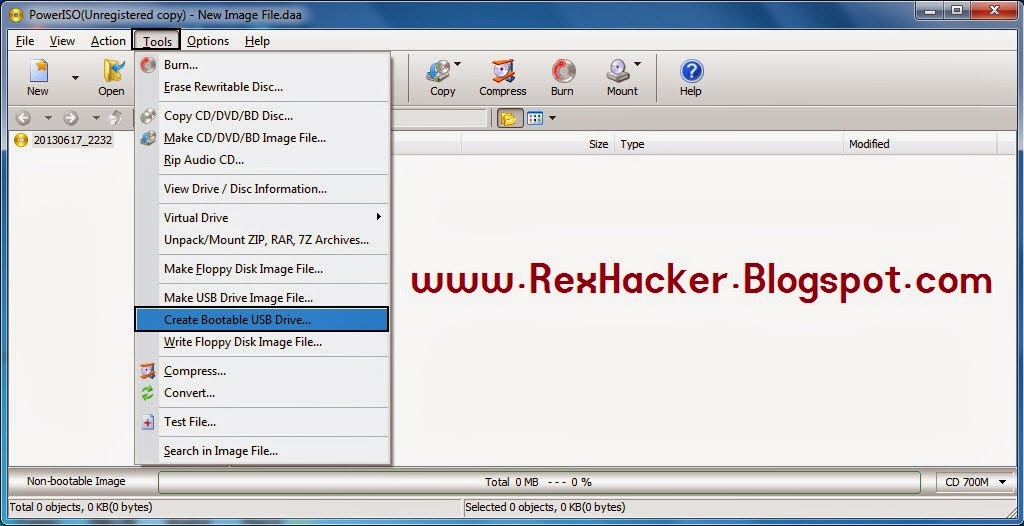
Step: 3- After that… a new popup will appear. Click on browse option and browse it to Windows .iso whether it is windows XP, 7, 8.

Step: 4- Chooses Windows .iso file. Here I am choosing for Windows 8. You can choose for any windows version.

Step: 5- Choose Writing Method as USB – HDD. I mostly recommend you to choose this one.

Step: 6- After choosing the writing method. A new popup will after saying “All data in the USB drive will be overwritten. Do you want to continue?” Click On Ok

Note:- Before making a bootable USB drive, make sure that you have made a backup of you data in the USB drive… otherwise it will be deleted.
Configuring The BIOS:
To reboot your PC, you must have to go into BIOS configuration to boot your PC from USB drive.
1. Reboot your system.
2. During booting, ensure that you are doing it before Windows starts loading, just jump into the BIOS configuration screen by typing hotkeys like F1, F2, Delete or Escape buttons. You will all Hotkey instructions on your screen.
3. Jump into the BIOS in which your boot devices are there.
4. The USB drive might not be listed there. If it is not there, then, it means that your system is not supporting booting from USB drive. Supposing that it is supported, promoting our USB drive to the primary boot device.
5. At last, exit from the BIOS configuration with saving all changes.
6. PC will automatically get restarted.
Configuring The BIOS:
To reboot your PC, you must have to go into BIOS configuration to boot your PC from USB drive.
1. Reboot your system.
2. During booting, ensure that you are doing it before Windows starts loading, just jump into the BIOS configuration screen by typing hotkeys like F1, F2, Delete or Escape buttons. You will all Hotkey instructions on your screen.
3. Jump into the BIOS in which your boot devices are there.
4. The USB drive might not be listed there. If it is not there, then, it means that your system is not supporting booting from USB drive. Supposing that it is supported, promoting our USB drive to the primary boot device.
5. At last, exit from the BIOS configuration with saving all changes.
6. PC will automatically get restarted.
Available link for download
Monday, January 16, 2017
Hide or Remove OneDrive icon from file explorer in Windows 10 Updated
Hide or Remove OneDrive icon from file explorer in Windows 10 Updated
Hide or Remove OneDrive icon from File Explorer in Windows 10 - thats what we gonna
see in this post - Works on Windows 10 Creators Update, Windows 10
Anniversary Update, and other editions of Windows like Windows 10 earlier builds like Aug 2015
and Nov 2015 builds.
In our last post we had seen how to stop OneDrive Sync in Windows 10 which explains the concept
of disabling OneDrive sync in Windows 10 without any software..
This post is a continuation of the last post, which means even though we had hided OneDrive from
Windows 10 but,it will still appear on File Explorer. So, this post shows how to hide OneDrive
from File Explorer in Windows 10.
Do you need any software ?
No, you dont need to download software to hide OneDrive in file explorer of Windows 10, just
follow the below steps..
How to hide OneDrive icon in File Explorer in Windows 10...
1) First Open Registry Editor
[ Helpful link :How to Open registry editor in Windows 10]
2) Navigate to the following...
HKEY_CLASSES_ROOTCLSID{018D5C66-4533-4307-9B53-224DE2ED1FE6}
3) Now, on your right pane, you can find an item named
System.IsPinnedToNameSpaceTree
4) Double click on it
5) You will see 1 in the value data field.
6) Delete the value 1 on the box
7) Now, the box will be empty Type 0.
8) Click on OK.
Thats it..
But, if you are using x64 Bit version of Windows 10
[ Helpful link : How to Find what version of Windows you are using]
then, do the following..
How to hide OneDrive icon from File Explorer in x64 version of Windows 10
1) First Open Registry Editor
[ Helpful link :How to Open registry editor in Windows 10]
2) Navigate to the following...
HKEY_CLASSES_ROOTWow6432NODECLSID{018D5C66-4533-4307-9B53-
224DE2ED1FE6}
3) Now, on your right pane, you can find an item named
System.IsPinnedToNameSpaceTree
4) Double click on it
5) You will see 1 in the value data field.
6) Delete the value 1 on the box
7) Now, the box will be empty Type 0.
8) Click on OK.
Like this you can hide OneDrive on any Windows 10 Laptop and Windows 10 desktop.
Hope it is helpful..
Are you a beginner to Windows 10 ?? then here is a chance to get free Windows 10 related posts
everyday, just follow us on social media.subscribe to our Email Posts or YouTube channel (Links are
on the right pane)and learn new things..
Thats the end of this post..
Click to read all basic tutorials..
see in this post - Works on Windows 10 Creators Update, Windows 10
Anniversary Update, and other editions of Windows like Windows 10 earlier builds like Aug 2015
and Nov 2015 builds.
In our last post we had seen how to stop OneDrive Sync in Windows 10 which explains the concept
of disabling OneDrive sync in Windows 10 without any software..
This post is a continuation of the last post, which means even though we had hided OneDrive from
Windows 10 but,it will still appear on File Explorer. So, this post shows how to hide OneDrive
from File Explorer in Windows 10.
Do you need any software ?
No, you dont need to download software to hide OneDrive in file explorer of Windows 10, just
follow the below steps..
How to hide OneDrive icon in File Explorer in Windows 10...
[Video Tutorial]
1) First Open Registry Editor
[ Helpful link :How to Open registry editor in Windows 10]
2) Navigate to the following...
HKEY_CLASSES_ROOTCLSID{018D5C66-4533-4307-9B53-224DE2ED1FE6}
3) Now, on your right pane, you can find an item named
System.IsPinnedToNameSpaceTree
4) Double click on it
5) You will see 1 in the value data field.
6) Delete the value 1 on the box
7) Now, the box will be empty Type 0.
8) Click on OK.
Thats it..
But, if you are using x64 Bit version of Windows 10
[ Helpful link : How to Find what version of Windows you are using]
then, do the following..
How to hide OneDrive icon from File Explorer in x64 version of Windows 10
1) First Open Registry Editor
[ Helpful link :How to Open registry editor in Windows 10]
2) Navigate to the following...
HKEY_CLASSES_ROOTWow6432NODECLSID{018D5C66-4533-4307-9B53-
224DE2ED1FE6}
3) Now, on your right pane, you can find an item named
System.IsPinnedToNameSpaceTree
4) Double click on it
5) You will see 1 in the value data field.
6) Delete the value 1 on the box
7) Now, the box will be empty Type 0.
8) Click on OK.
Close the Window.
Thats it..
Like this you can hide OneDrive on any Windows 10 Laptop and Windows 10 desktop.
Hope it is helpful..
Are you a beginner to Windows 10 ?? then here is a chance to get free Windows 10 related posts
everyday, just follow us on social media.subscribe to our Email Posts or YouTube channel (Links are
on the right pane)and learn new things..
Thats the end of this post..
Click to read all basic tutorials..
Available link for download
Subscribe to:
Posts (Atom)