Showing posts with label file. Show all posts

Tuesday, March 14, 2017

Get help with file explorer in Windows 10 Updated

Get help with file explorer in Windows 10 Updated


Get help with file explorer in Windows 10 - Thats the text that will open in your browser when

you pressed F1 key whether it is accidentally or when you need to get help. As Windows have its

own help system with an virtual assistant inside it named cortana. Here is your guide on how to get

help with file explorer in windows 10.

How can i get help in Windows 10


You can get help in windows 10 at anytime by just pressing the F1 key on your Keyboard.

apart from surfing  the web on answers.microsoft.com or some forums where our friends 

will post a solution to our well known and unknown problems.

OK, coming to the point here is an post that was designed to get help with file explorer 

in Windows 10.

How to get help with file explorer ?

First, if you are a beginner then you need to learn what is file explorer in windows 10.

refer the below link for details..

[Helpful link : What is file explorer and how to open it in Windows 10 ]

2) You can do everything with the file explorer

You can open Control panel, open settings, show or hide folders, drives and files using the 

file explorer.

[ Helpful links : 

How to open control panel in Windows 10

How to open settings App in Windows 10

How to enable the hidden libraries in Windows 10

How to show hidden folders, files in Windows 10

How to open any file in single click or double click

How to hide empty drives that are shown in the file explorer of Windows 10

Click to read all basic tutorials..]

The First step in the file explorer is to customize the file explorer

How do i Customize file explorer in Windows 10

You can pin an item for quick access..

How to do i Pin an folder for quick access

If you need any folder to Pin to quick access, then simply right click on the folder and simply click Pin to Quick access option.


How do i Remove files or folders from quick access in Windows 10

If you dont like an folder that resides in the quick access , cool ! you can remove it..

Just right click on the item and select remove from Remove from quick Access..

How to unpin desktop,documents,downloads,pictures from quick access in Windows 10.

If you wish to unpin a desktop or documents, downloads,music,etc from quick access then simply,

right click on the folder and select unpin from Quick Access..


The above mentioned are just a simple part of File explorer, if you wish to use more with file

explorer then simply check our beginners articles [ Link]


Thats the end of this post..

If you wish to know everything that we post, then simply follow us on social media and get updates for free ..

Available link for download

Read more »

SONY Xperia J Version 4 1 2 ST26i flash file download

SONY Xperia J Version 4 1 2 ST26i flash file download


SONY Xperia J (Version 4.1.2) ST26i Free Flash File
Download Here

Available link for download

Read more »

Monday, March 13, 2017

J500GXXU1AOG4 Android 5 1 1 XXU1AOG4 Firmware for Galaxy J5 SM J500G flash file

J500GXXU1AOG4 Android 5 1 1 XXU1AOG4 Firmware for Galaxy J5 SM J500G flash file


samsung Galaxy J5 SM-J500G flash file download

J500GXXU1AOG4: Android 5.1.1 XXU1AOG4 Firmware is now available at Android Officer. Samsung rolled out the XXU1AOG4 5.1.1 Lollipop official firmware update for Galaxy J5 SM-J500G. The firmware update recently out by Samsung and the users can manually download J500GXXU1AOG4 to update their device. The users can also update their device to this new firmware through Samsung Kies or OTA (Over the Air). It is always recommended to update your device with the latest firmware whenever Samsung rolled out as with every update Samsung introduces fixes for bugs (if any), improve/enhance overall performance in OS and sometime introduces new features. Here at AndroidOfficer, you’ll find both official and manual way to update this latest firmware on your Samsung SM-J500G. Scroll through this page to learn how to install stock J500GXXU1AOG4 Android 5.1.1 Lollipop firmware on Galaxy J5 SM-J500G. However, flashing or installing official firmware restore device kernel, so root access to your device will be void, means the firmware update will unroot your device (if it was rooted). 

There are two official ways to update the J500GXXU1AOG4 Android 5.1.1 Lollipop stock firmware, OTA and KIES. However, if you unable to update your device through OTA and Kies, then you can flash stock firmware manually through Odin. AndroidOfficer always recommend you to try official ways (OTA or KIES) first and if official method don’t work then try manual method to flash the stock firmware.

J500GXXU1AOG4 Android 5.1.1 Firmware Details:

Device: Samsung Galaxy J5
Model: SM-J500G
Version: Android 5.1.1 Lollipop
PDA: J500GXXU1AOG4

Samsung Galaxy J5 SM-J500G

Warning!

The firmware is released only for the Samsung Galaxy J5 SM-J500G. So, don’t try this tutorial on any other Android device and also the tutorial is based on Windows PC. AndroidOfficer is not responsible If anything wrong happens to your device after following this guide, try this at your own risk. However, we believe that if you follow the instructions carefully that mentioned in this guide, your device shouldn’t face any issue.

Pre Requisites:

Before proceeding to update guide, AndroidOfficer recommend to backup all your device data and settings to restore later when you need that. However, official firmware restore all previous data but if your device get stuck at bootloop issue or fall into any error, the backup file will help you to restore all your data.
  1. Check your device battery percentage, make sure that your device have at least 60% battery power (How to Check Battery Percentage on Android Devices)
  2. Backup all your device data and settings to external storage- (How to Backup Android Data and Settings)
  3. Check that USB Debugging is Enabled on your device, otherwise it is not possible to connect and transfer files between PC and Galaxy J5 SM-J500G via USB- (How to Enable/Disable USB Debugging on Android Devices)
  4. Install USB Driver for Galaxy J5 SM-J500G on your PC (Download USB Driver) 
Note That:
  • If your Galaxy J5 SM-J500G have any Custom ROM installed such as- CyanogenMod ROM, ParanoidAndroid ROM, AOKP ROM, SLIM ROM, PACman ROM, Avatar ROM, Omni ROM, LiquidSmooth ROM, Beanstalk ROM, Carbon ROM etc, then it’ll be replaced by stock firmware.
  • Custom Recovery such as ClockWorkMod Recovery (CWM) or TWRP or Philz Recovery will be replaced by Stock Recovery.

How to Install/Update Official Firmware on Galaxy J5 SM-J500G via OTA (Over the Air):

  1. Turn on Internet connection on your device (should have stable Internet connection)
  2. Go to Settings>>About, and tap on the Update Option from there (If its show “The latest update have already been installed” message, then your device haven’t receive any OTA yet, check back later or try installing through Kies.)
  3. Tap OK to start the download and installation process
  4. Once done, your device will reboot automatically

How to Install/Update Official Firmware on Galaxy J5 SM-J500G via Samsung Kies:

  1. Turn on Internet connection on your device (should have stable Internet connection)
  2. Download and Install Samsung Kies Utility on your PC
  3. Connect your device to PC through USB
  4. Open/Run Samsung Kies, it should automatically detect your device
  5. At the Samsung Kies home screen, you’ll see New Firmware Upgrade is available notification (If it show- “This is the last firmware”, then your device haven’t received the latest firmware on Kies, check back later or try flashing manually through Odin)
  6. Click on the Firmware Upgrade button to start the update process
  7. Follow onscreen instructions
  8. Once done, your device will be reboot automatically
  9. After reboot, you can disconnect your device from PC 
If both the above official way don’t work for you, then download firmware from the below list and follow the manual installation guide as it is.

Download J500GXXU1AOG4 Android 5.1.1 Lollipop Firmware

Note that: you can flash/install any firmware from the below list if the firmware for your country is not available, except those firmware comes with their carrier name.

Cambodia: J500GXXU1AOG4_J500GOLB1AOG5_CAM

Philippines (Globe): J500GXXU1AOG4_J500GOLB1AOG5_GLB 

Philippines (Smart): J500GXXU1AOG4_J500GOLB1AOG5_SMA 

Malaysia: J500GXXU1AOG4_J500GOLB1AOG5_XME 

Indonesia: J500GXXU1AOG4_J500GOLB1AOG5_XSE
[P.S- The list will be updated with rest of the countries/carrier when respective firmware will release]
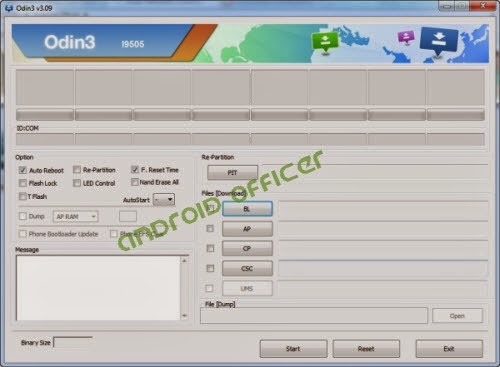
odin-3.09-home-screen

How to Install/Update Official Firmware on Galaxy J5 SM-J500G Manually through Odin:

  1. Download firmware from the above list and extract the zip file, you should get .tar.md5 file along with few other files.
  2. Download Odin v3.09 and extract the zip file, you should get Odin v3.09.exe file along with other files.
  3. Now Open/Run Odin v3.09.exe file as an administrator (to open program with admin privilege, right click on the Odin v3.09.exe file and click on the “Run as administrator” from the context menu, this is applicable only on Windows Vista, Windows 7 or higher PC)
  4. Switch off and boot Galaxy J5 J500G into Download Mode by pressing and holding the Volume Down+Home+Power buttons together (long press until the boot screen appear). A warning message will flash, now press Volume Up key to proceed to Download Mode.
  5. Now connect your Galaxy J5 J500G to your PC via USB cable
  6. In Odin screen, you should see a COM Port number like “0:[COM7]” at ID:COM section and “Added!” text at the message box. This means your device has been successfully detected by Odin. (If not, then try connecting through another USB port. If you are using desktop PC, use USB port located at the back of the CPU. If still don’t work, then you should reinstall the USB driver and try again)
  7. Make sure that, only the “Auto Reboot” and “F. Reset Time”options are checked in Odin screen.
  8. Now, click on the AP button and select the .tar.md5 file that you get by extracting the firmware zip file in step 1.
  9. Now, click on the Start button to begin the installation process, and wait few moments.
  10. Once completed, you would see “PASS!” message in ID:COM port having green background
  11. Your phone should automatically reboot after completion
  12. You can now disconnect/unplug your phone from computer
Congrats! your Galaxy J5 SM-J500G now updated to the J500GXXU1AOG4 Android 5.1.1 Lollipop stock firmware. Now, go to Settings>>About, and verify the firmware update.

How to Fix Bootloop on Galaxy J5 SM-J500G

If anything goes wrong, your device may stuck at booting animation. If your Galaxy J5 SM-J500G stuck at boot animation screen for more than 10 minutes, then follow these instructions:
  • Go to Recovery Mode by pressing and holding the Volume Up+Home+Power buttons together.
  • Now, perform Wipe Data/Factory Reset and Wipe Cache Partition task before selecting the reboot system now option. In Recovery Mode use the Volume keys to navigate between options and Power key to select any option.
Note that: Wipe task process will erase all your device internal memory data but not the external SD card data.

Available link for download

Read more »

Sunday, March 12, 2017

Update HTC One M9 to Official Marshmallow Firmware with Latest RUU File

Update HTC One M9 to Official Marshmallow Firmware with Latest RUU File


 Update HTC One M9 to Official Marshmallow Firmware with Latest RUU File


htc-one-m9
HTC One A9 and the M8 devices received official Android 6.0 Marshmallow firmware from the manufacturer last month. HTC releases firmware updates in the form of large RUU files. The files weigh nearly 2 GB. However, the installation is pretty simple as compared to other devices from various manufacturers. Here, we have listed the latest RUU file for the HTC One M9 device and is a maintenance release from HTC that also incorporates the latest Marshmallow firmware.
This software upgrade comes in the form of two sequential updates. The first update will install software version 2.11.617.180, which does not include theAndroid OS upgrades. The following update will install software version3.35.617.12, which includes the changes to the Android OS.
Before you proceed, please confirm that this software upgrade to 3.35.617.12 is a newer version than what is currently loaded on your device. If it is the same version, there is no need to reload the software. Navigate to the Home screen, then tap All apps > Settings > About and locate the Software information. If your Software number is less than 3.35.617.12, you should proceed with theupgrade.
Take a look at the official HTC portal to know more about the update, changelog, and installation instructions.
Warning: During the upgrade process the device will reboot multiple times and show software upgrade screens. Do not remove the AC charger or long-press the Power button as this might stop the update and your device may be rendered inoperable! We, at DroidViews, won’t be liable for any damage to your device whatsoever. We won’t be held responsible if you brick your device. Reader’s discretion is advised.

 Download

  • Latest RUU File for HTC One M9 — Download | RUU version 3.35.617.12 [2.14 GB]
  • Latest RUU.zip file  — Download | Will be updated here once available
Backup Apps and DataThis process wipes all of your data. Hence, a backup is highly recommended. Make sure you backup your system, data, etc. on your PC. It will be helpful in case anything goes wrong.

Prerequisites

  • This guide is compatible with various HTC One M9 device.
  • Do this if you use Method 2 or 3. Set up ADB and Fastboot on your computer. You can download the full Android SDK from here, or get the quick ADB and Fastboot installer from here. For Mac or Linux OS, click here. You may also like HTC Fastboot tool for the HTC devices.
  • Install HTC USB Drivers on your computer.
  • Open Settings> Developer options and enable USB Debugging on your device.
  • Go to Developer options and enable Allow OEM unlock, if such an option is available.

Method 1: Restore HTC One M9 to Official Marshmallow Firmware with RUU.EXE File

If you have the RUU.EXE file, then the above methods won’t work for you and the flash process will be comparatively easy. The zip files have been extracted from the RUU.zip files. To go through this process successfully, make sure you have the latest HTC drivers or the HTC Sync installed. Connect your phone to your computer and launch the RUU.EXE file. Follow instruction from the RUU program.
Listed below are the alternative methods to install the RUU files. However, you will need the RUU.zip file for that purpose. Once the zip file is available, go through the two methods below and it should update your device in no time.

Method 2: Restore HTC One M9 to Official Marshmallow Firmware with Fastboot

  • Download the RUU zip file. You don’t need to extract the file. just transfer the file to your PC where you can easily locate it.
  • Make sure you have setup ADB and Fastboot on your PC. Also, accept Always allow from this computer when you plug in the device for the first time to enable USB Debugging.
  • Now power off your device and unplug it from your PC.
  • Boot into the Bootloader or Fastboot mode. To do so, turn off your device and then press and hold  volume down + the power button simultaneously for a few seconds. When you see the bootloader screen, connect your device to the PC using a USB cable.(Choose Fastboot if option is available) For an alternative method look at the end of method 1.
  • Navigate to the location where you have placed the RUU file. Rename therecovery file to a simple one, like htc_am9_ruu.img. While the folder withhtc_m9_ruu.img file is open, hold the shift key on the keyboard and right-click on an empty space and select “Open command window here” option to launch a cmd window.
  • Now issue the following command in the command prompt to check your device connectivity
fastboot devices
  • Now flash the RUU. Issue the following command for that.
htc_fastboot flash zip <file name>.zip
  • Now the firmware will start installing.
Once you have installed TWRP, you are all set to install custom packages onto the device’s system. Alternatively, on Linux or Mac OS, you can issue “./htc_fastboot flash zip <file name>.zip” command to flash the RUU zip file.
How to boot into bootloader or Fastboot mode using ADB
You can also issue the following command through your cmd or terminal, while connected to the PC, in order to boot into the bootloader. First setup ADB and the Fastboot environment from requirements and then follow instructions till step 5. Once into the command prompt or terminal, issue the following command:
adb reboot bootloader

Method 3: HTC One M9 to Official Marshmallow Firmware with RUU.ZIP File

Here is an alternative method for installing the RUU.zip file.
  • First, rename the RUU zip file to “2PQ9IMG.zip”, save it at the root of your external SDcard.
  • Reboot the phone in bootloader mode. Refer to the method one in order to boot into bootloader.
  • Now it will start scanning the SDcard and detect the 2PQ9IMG.zip file.
  • When asked, “Do you want to start update?”.
  • Use your volume Up/Down key to start or cancel the flash.
  • Wait for the process to complete and don’t turn off your phone during the flash.
Once you successfully update your phone software, you can now enjoy your stock firmware.
For queries, comment down below. Like and share us on social platforms. If you need help with other devices, let us know.

Available link for download

Read more »

Friday, March 10, 2017

How To Flash Update Samsung Galaxy J2 firmware flash file

How To Flash Update Samsung Galaxy J2 firmware flash file


Tutorial Flash / reinstall Samsung Galaxy J2 SM-J200GU for download errors, application errors, the touchscreen is not sensitive, exposed to the virus internal memory, loading a boot loop, until the hardbrick could be detected in a firmware update for the computer drivers. possible you can also do a RESET Galaxy J2 SM-J200GU by pressing three key combination. when the position device off press and hold the "Vol Up + Home + Power" until the picture android robot. then do wipe data users but sometimes this is not enough to help the HH is needed Flashing Update
  • Tool :
  1. Usb driver Here or samsung kies Here
  2. Odin v3 Here
  3. Firmware Galaxy J2 J200GU
  • Tutorial Flashing :
  1. Install Usb Driver Samsung or Samsung Kies on your computer
  2. Extract the firmware Galaxy J2 with win rar to find .md5 file
  3. Turn off your galaxy. press and hold the Volume down + Home + Power for download mode and press volume up
  4. connect to a computer with a cable usb
  5. Open odin exe v3
  6. see odin whether in the column ID: COM colored blue
  7. If the ID: COM has blue means its ready to stage flash process
  8. Click the PDA in Odin and navigate the firmwarefile in exktak and select the file name so J200XXXXXXX.md5 
  9. Wait a minute until Odin success prepare files
  10.  Click START in Odin Wait until the process is complete (PASS) Restart Finish 

Available link for download

Read more »

Tuesday, March 7, 2017

VIVO FIRMWARE FLASH FILE 100 TESTED WITHOUT PASSWORD

VIVO FIRMWARE FLASH FILE 100 TESTED WITHOUT PASSWORD


  VIVO FIRMWARE FLASH FILE 100% TESTED WITHOUT PASSWORD
 
 
y622 Y3 Y29L Y28L Y27 Y23L

Available link for download

Read more »

Monday, March 6, 2017

How to Share Any File on WhatsApp Messenger

How to Share Any File on WhatsApp Messenger


Requirements:
  • File to be shared for example an APK file
  • APK Extractor, get it HERE
  • File Manager (Explorer) get it HERE
Steps:
  1. Firstly, if the apk is not handy and needs to extracted from the installed app, use the Apk Extractor to extract it and save it to your device.
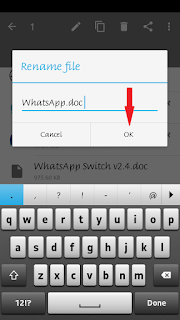
  2. Browse to the file that you want to share and edit the file extention. In simple terms a file extention are the last letters that you see after the file name. For example the whatsapp file has a file extension of APK so in your File Manager you should be able to see something like this, whatsapp.apk
  3. Now using your File Manager convert the file that you want to share to a document format by editing the file extension. For example whatsapp.apk should be converted to whatsapp.doc simply by editing the file extension.
  4. Thats it, now save the file in any location on your device and share it on WhatsApp Messenger as a document.
NOTE: Whoever receives the document must also convert it back to an APK file in order to install it on their device. This trick also works for files with file extentions like zip, rar, exe, jar, pdf to mention but a few.
Softek Systems™
Enjoy!


Available link for download

Read more »

Sunday, March 5, 2017

SHAREit File Transfer Sharing v3 6 98 APK Latest

SHAREit File Transfer Sharing v3 6 98 APK Latest


SHAREit APP DOWNLOAD

The world’s fastest way to share photos, applications and also more across gadgets.

The world’s fastest means to discuss images, applications and also even more across devices without network fees or Wi-Fi connection. Lenovo SHAREit eliminates the requirement for cords to wirelessly move details quickly between gadgets– either with buddies, or to take your individual material on the move.

 Features: 
Share every little thing with various other devices– pictures, videos, music data, documents, get in touches with even applications.

Gadgets with SHAREit can immediately find each other when in variety.

Transfer HUGE data and video clips in seconds … around 40x faster compared to Bluetooth.

Share without the demand for Bluetooth, phone network or active Wi-Fi network you do not pay a cent for network charges. Instruments wirelessly attach straight.

Also the app itself could be discussed to other devices wirelessly, and swift sharing can start immediately.

Supports group sharing around 5 devices all at once. Instantly share a party video clip, music cd or image library to approximately 5 pals at the same time.
It much better than AirDrop! SHAREit supports not simply Android phones, tablet computers, but additionally sustains apple iphone, iPad & even WIndows COMPUTER. It’s a truly cross-platform transmission device.


Download SHAREit: File Transfer,Sharing v3.6.98 APK

This Post is Protected by Wanem Club © Copyright 2016-2017, All Rights Reserved.

Available link for download

Read more »

Sunday, February 26, 2017

Sony XPERIA SP C5303 flash file Android 4 3 firmware 12 1 A 1 207

Sony XPERIA SP C5303 flash file Android 4 3 firmware 12 1 A 1 207


1. how to install the newest Android 4.3 for Sony XPERIA SP C5303
a) first of all, check your firmware version (if you already have the newest one, you do not need this tutorial)
b) download and install latest Flashtool from this article
c) download also latest Android 4.3 (mirror Google Drive) for Sony XPERIA SP C5303
d) paste the ftf file downloaded in step c) to folder „Firmware“ included in the XPERIA Flashtool
e) open the XPERIA Flashtool, click on flash and choose downloaded firmware, than click ok. Important - if you do not want to delete any data of your phone, just uncheck flashing userdata.sin file. All data will remain in your phone, but sometimes it can cause additional troubles. So it is better (and I recommend that) to do the backup of your personal data, than proceed with clean instalation and then restore your personal data.
f) turn off your phone and when Flashtool shows pop up window, connect phone to PC with holding volume down button 
g) after few minutes all is done and your phone gets the new firmware
2. how to install the newest Android 4.1.2 for Sony XPERIA SP C5303
a) first of all, check your firmware version (if you already have the newest one, you do not need this tutorial)
b) download and install latest Flashtool from this article
c) download also latest Android 4.1.2 (mirror Google Drive) for Sony XPERIA SP C5303
d) paste the ftf file downloaded in step c) to folder „Firmware“ included in the XPERIA Flashtool
e) open the XPERIA Flashtool, click on flash and choose downloaded firmware, than click ok. Important - if you do not want to delete any data of your phone, just uncheck flashing userdata.sin file. All data will remain in your phone, but sometimes it can cause additional troubles. So it is better (and I recommend that) to do the backup of your personal data, than proceed with clean instalation and then restore your personal data.
f) turn off your phone and when Flashtool shows pop up window, connect phone to PC with holding volume down button 
g) after few minutes all is done and your phone gets the new firmware
 4. how to unlock your bootloader
a) download and install latest Flashtool from this article
b) start Flashtool and click on BLU button on the top
c) turn off your device and when Flashtool shows pop up window, connect device to PC with holding volume down button
d) Flashtool will check your device and than you need to connect your device once more, now with holding volume up button
e) click on get unlock key button, it will switch you to Sony Mobile website, here select your phone and hit continue
f) fill your email adress and accept terms and conditions, than click submit
g) go to your mailbox and click on Click here to proceeed link in mail from Sony Mobile
h) copy IMEI from Flashtool to Sony Mobile site and once more accept term and contidion, than click submit
i) copy unlock key to Flashtool window and than click unlock
j) your device is unlocked


5. how to relock your bootloader
a) download and install latest Flashtool from this article
b) start Flashtool and click on BLU button on the top
c) turn off your phone and when Flashtool shows pop up window, connect phone to PC with holding volume down button
d) just click on relock button and your bootloader is locked for now

Available link for download

Read more »

Wednesday, February 22, 2017

Galaxy S5 Stock Firmware FLASH FILE

Galaxy S5 Stock Firmware FLASH FILE


AT&T Galaxy S5 SM-G900A
This is a page dedicated to Galaxy S5 stock firmware. For international Galaxy S5 stock firmware, please check SamFirmware.com. Galaxy S5 stock firmwares are 100% stock firmwares that you can use to get your Galaxy S5 back to factory state software.  For installation of stock firmware, see
Download Android 4.4.2 UCU1ANCE Firmware for AT&T Galaxy S5 SM-G900A


Available link for download

Read more »

Tuesday, February 14, 2017

sony xperia T2 Ultra Dual D5322 flash file download

sony xperia T2 Ultra Dual D5322 flash file download


T2 Ultra Dual D5322 19.3.A.0.470 5.0.2 Firmware

a

T2 Ultra Dual D5322 19.3.A.0.470 5.0.2 Lollipop Firmware 
Download Tested File By Welcome Zone Haldwani

T2 Ultra Dual D5322 Lollipop Software Download 

T2 Ultra Dual D5322 Android 5.0.2 Flash file Download 

T2 Ultra Dual D5322 Android Latest Flash File Download

DOWNLOAD CLICK HERE

Available link for download

Read more »

Sunday, February 12, 2017

Flash stock firmware on Galaxy Note 3 Neo SM N750 flash file download

Flash stock firmware on Galaxy Note 3 Neo SM N750 flash file download


Here is the guide to flash stock firmware on our device. 

Download firmware from here - 

I) Bangladesh - http://rapidgator.net/file/36ba0c121...71615.zip.html

II) India(INU) - http://rapidgator.net/file/af8780e8c...50602.zip.html

III) India(INS) - http://rapidgator.net/file/1ead801e6...72237.zip.html


Procedure - 
1. Download Odin from here - http://rapidgator.net/file/cb00b5952...v3.09.zip.html

2. Extract Firmware zip file that you downloaded earlier from above link, you will get a .tar.md5 file and some other files (optional).

3. Extract Odin zip file and you will get Odin3
v3.09.exe along with few other files.

4. Power off your Android device. Wait 5-6
seconds for vibration to confirm complete
switch off.

5. Now, put the Galaxy Note 3 Neo SM-N750 in
Download Mode by pressing and holding
down the Home & Volume Down button
together while pressing the Power button. A
warning screen will come up; press Volume
Up button to enter Download Mode.

6. Now run Odin3 v3.09.exe (see Step 3) as an
Administrator because Admin privileges is
required to complete the process smoothly
(only applicable Windows Vista and higher).

7. Now connect your device to your PC using
USB cable. An “Added!!” massage will appear
in Odin’s message box. If you don’t get the
same then you should try another USB port
(try USB port located in back in your desktop
PC). If that too don’t work then you should
reinstall the driver. If you successfully see the
“Added!!” message in Odin then you are ready
to go in next step. You should also see COM
port with a number in Yellow if you
successfully added your device.

8. Click the AP Button, and select that .tar.md5
file that you get in Step 2. If you are using old
Odin then add the file to PDA button.

9. In Odin window, make sure only Auto Reboot
and F. Reset Time check boxes are selected.

10. Double check everything that we mentioned in Step 8 & Step 9 above. Now, once satisfied hit the START button to begin the flashing
process.

11. Once flashing completed, your Galaxy Note 3 Neo SM-N750 will restart and soon you will
see a PASS message with green background
in the left-most box at the very top of the
Odin. You can now unplug the USB cable to
disconnect your device from computer.


Congrats! You just updated your Galaxy Note 3 Neo
SM-N750 to Android 4.3 Jelly Bean firmware. Go to
Settings > About device to verify this firmware
update. 

Available link for download

Read more »