Showing posts with label windows. Show all posts
Showing posts with label windows. Show all posts
Tuesday, March 14, 2017
Get help with file explorer in Windows 10 Updated
Get help with file explorer in Windows 10 Updated
Get help with file explorer in Windows 10 - Thats the text that will open in your browser when
you pressed F1 key whether it is accidentally or when you need to get help. As Windows have its
own help system with an virtual assistant inside it named cortana. Here is your guide on how to get
help with file explorer in windows 10.
How can i get help in Windows 10

You can get help in windows 10 at anytime by just pressing the F1 key on your Keyboard.
apart from surfing the web on answers.microsoft.com or some forums where our friends
will post a solution to our well known and unknown problems.
OK, coming to the point here is an post that was designed to get help with file explorer
in Windows 10.
How to get help with file explorer ?
First, if you are a beginner then you need to learn what is file explorer in windows 10.
refer the below link for details..
[Helpful link : What is file explorer and how to open it in Windows 10 ]
2) You can do everything with the file explorer
You can open Control panel, open settings, show or hide folders, drives and files using the
file explorer.
[ Helpful links :
How to open control panel in Windows 10
How to open settings App in Windows 10
How to enable the hidden libraries in Windows 10
How to show hidden folders, files in Windows 10
How to open any file in single click or double click
How to hide empty drives that are shown in the file explorer of Windows 10
Click to read all basic tutorials..]
The First step in the file explorer is to customize the file explorer
How do i Customize file explorer in Windows 10
You can pin an item for quick access..
How to do i Pin an folder for quick access
If you need any folder to Pin to quick access, then simply right click on the folder and simply click Pin to Quick access option.
How do i Remove files or folders from quick access in Windows 10
If you dont like an folder that resides in the quick access , cool ! you can remove it..
Just right click on the item and select remove from Remove from quick Access..
How to unpin desktop,documents,downloads,pictures from quick access in Windows 10.
If you wish to unpin a desktop or documents, downloads,music,etc from quick access then simply,
right click on the folder and select unpin from Quick Access..

The above mentioned are just a simple part of File explorer, if you wish to use more with file
explorer then simply check our beginners articles [ Link]
Thats the end of this post..
If you wish to know everything that we post, then simply follow us on social media and get updates for free ..
you pressed F1 key whether it is accidentally or when you need to get help. As Windows have its
own help system with an virtual assistant inside it named cortana. Here is your guide on how to get
help with file explorer in windows 10.
How can i get help in Windows 10
You can get help in windows 10 at anytime by just pressing the F1 key on your Keyboard.
apart from surfing the web on answers.microsoft.com or some forums where our friends
will post a solution to our well known and unknown problems.
OK, coming to the point here is an post that was designed to get help with file explorer
in Windows 10.
How to get help with file explorer ?
First, if you are a beginner then you need to learn what is file explorer in windows 10.
refer the below link for details..
[Helpful link : What is file explorer and how to open it in Windows 10 ]
2) You can do everything with the file explorer
You can open Control panel, open settings, show or hide folders, drives and files using the
file explorer.
[ Helpful links :
How to open control panel in Windows 10
How to open settings App in Windows 10
How to enable the hidden libraries in Windows 10
How to show hidden folders, files in Windows 10
How to open any file in single click or double click
How to hide empty drives that are shown in the file explorer of Windows 10
Click to read all basic tutorials..]
The First step in the file explorer is to customize the file explorer
How do i Customize file explorer in Windows 10
You can pin an item for quick access..
How to do i Pin an folder for quick access
If you need any folder to Pin to quick access, then simply right click on the folder and simply click Pin to Quick access option.
How do i Remove files or folders from quick access in Windows 10
If you dont like an folder that resides in the quick access , cool ! you can remove it..
Just right click on the item and select remove from Remove from quick Access..
How to unpin desktop,documents,downloads,pictures from quick access in Windows 10.
If you wish to unpin a desktop or documents, downloads,music,etc from quick access then simply,
right click on the folder and select unpin from Quick Access..
The above mentioned are just a simple part of File explorer, if you wish to use more with file
explorer then simply check our beginners articles [ Link]
Thats the end of this post..
If you wish to know everything that we post, then simply follow us on social media and get updates for free ..
Available link for download

Problem in Connecting to Internet in Windows 10 Version 1607 Updated Solved
Problem in Connecting to Internet in Windows 10 Version 1607 Updated Solved
Windows 10 Anniversary Update - Problem in Connecting to Internet - How to fix guide..
If you are in Windows 10 Anniversary Update build 1607 then the main problem you had witnessed
is your internet will broke now and then.
Such scenario was experienced by me too,as my internet connection (which i initially suspected as
ISP problem ) suddenly changes to limited in Windows 10, even though internet works on my
android device connected to WiFi. So, here is an solution that will fix network connection issue in
your Windows 10 PC that worked for me.

1) The first thing i will do whenever i faced with such issue is restarting my PC, rebooting my PC will
fix the problem most of the times .
So, try restarting my PC( not shutdown)
[Helpful link : How to reboot or restart your Windows 10 ]
2) Though, the first solution will work in most case, we cant restart our PC everytime right ? So i recommend you to run Windows network diagnostic tool..
[See : How to download Windows network diagnostic tool in Windows 10]
Those are the solutions that worked for me.. i hope it works for you to.
Hope it helps..
Update : Microsoft declared it as an known issue and they had released an update named
KB3206632 (DEC 13, 2017 UPDATE] So, download and install the update it will fix that issue..
If you are in Windows 10 Anniversary Update build 1607 then the main problem you had witnessed
is your internet will broke now and then.
Such scenario was experienced by me too,as my internet connection (which i initially suspected as
ISP problem ) suddenly changes to limited in Windows 10, even though internet works on my
android device connected to WiFi. So, here is an solution that will fix network connection issue in
your Windows 10 PC that worked for me.
1) The first thing i will do whenever i faced with such issue is restarting my PC, rebooting my PC will
fix the problem most of the times .
So, try restarting my PC( not shutdown)
[Helpful link : How to reboot or restart your Windows 10 ]
2) Though, the first solution will work in most case, we cant restart our PC everytime right ? So i recommend you to run Windows network diagnostic tool..
[See : How to download Windows network diagnostic tool in Windows 10]
Those are the solutions that worked for me.. i hope it works for you to.
Hope it helps..
Update : Microsoft declared it as an known issue and they had released an update named
KB3206632 (DEC 13, 2017 UPDATE] So, download and install the update it will fix that issue..
Available link for download
KMSpico – Best Windows 10 and Office 16 Activator v10 2 0 Download Here ! LATEST
KMSpico – Best Windows 10 and Office 16 Activator v10 2 0 Download Here ! LATEST
 |
KMSpico Activator Free Download
KMSPico is the most successful, frequently updated and 100% clean tool to permanently activate any version of Windows and Microsoft office within matter of seconds.
It is a community developed tool to programatically activate Microsoft products such as Windows & Office without using a paid license.
Supported Products
- Windows Vista Bussines/Enterprise
- Windows 7 Professional/Enterprise
- Windows 8 Core/Pro/Enterprise
- Windows 8.1 Core/Pro/Enterprise
- Windows 8.1.x Core/Pro/Enterprise
- Windows 10 Home/Pro/Enterprise
- Office 2010
- Office 2013
- Office 2016
What’s New
- Fixed bugs with Windows 7/8 Activation.
How To Use ? (Intaller Edition)
- Disable any Anti-virus Program Temporarily
- Download and Install KMSpico From The Links Given Below
- KMSpico will run automatically (If it doesn’t, Go to KMSpico Installation Directory and Run KMSELDI.exe)
- Press The Red Button in the KMSpico window
- Done, Enjoy Windows and Office

How To Use ? (Portable Edition)
- Disable any Anti-virus Program Temporarily
- Download and Extract KMSpico Portable Archive
- Run “AutoPico.exe”
- It’ll Automatically Activate Windows and Office (If installed)
- Done, Enjoy
Screenshots


Note : Password Removed !
Downloads
KMSpico Intaller Edition (3 MB)KMSpico Portable Edition (4 MB)
Available link for download
Monday, March 13, 2017
System information in Windows 10 How to check or find your System Information in Windows 10 8 7 In 2 Steps
System information in Windows 10 How to check or find your System Information in Windows 10 8 7 In 2 Steps
System Information in Windows 10 - How to find or check System information using system
information panel in Windows 10 -
Thats what we gonna see in this Post. If you are looking for how to find PC info in windows 10,
Windows 8, Windows 7.
then here is a way to find your System information in Windows 10. - Works on Windows 10 Creators
Update, Windows 10 Anniversary Update and other earlier version of Windows 10.
Do you need software to find System info on Windows 10 ?
No, you dont need to download software to find system info in Windows 10, as it is very simple process..
then, how to find it ?
Its, just a simple process, though there are many methods available to find your system configuration
in windows 10, here i show the simplest method to find system information in windows 10.
How to my System Information in Windows 10..

1) Press Windows + R Keys
2) Type Msinfo32
3) Press Enter
(or) Click OK.
4) It will open a new window, on that window on System Summary , you can find on your system
information.
Thats it..
Hope it is helpful
Are you a beginner ? then, you can check all our Windows 10 basic articles here [Link]
information panel in Windows 10 -
Thats what we gonna see in this Post. If you are looking for how to find PC info in windows 10,
Windows 8, Windows 7.
then here is a way to find your System information in Windows 10. - Works on Windows 10 Creators
Update, Windows 10 Anniversary Update and other earlier version of Windows 10.
Do you need software to find System info on Windows 10 ?
No, you dont need to download software to find system info in Windows 10, as it is very simple process..
then, how to find it ?
Its, just a simple process, though there are many methods available to find your system configuration
in windows 10, here i show the simplest method to find system information in windows 10.
How to my System Information in Windows 10..
1) Press Windows + R Keys
2) Type Msinfo32
3) Press Enter
(or) Click OK.
4) It will open a new window, on that window on System Summary , you can find on your system
information.
Thats it..
Hope it is helpful
Are you a beginner ? then, you can check all our Windows 10 basic articles here [Link]
Available link for download
Download Windows 7 Ultimate SP1 November 2016 Incl Activator Full Software
Download Windows 7 Ultimate SP1 November 2016 Incl Activator Full Software

Language: English, French, Arabic
Treatment: Activator Included
System requirements: Processor: 1 gigahertz (GHz) or higher. * RAM: 1 gigabyte (GB).
-Integrated update on November 18, 2016;
-Integrate language packs: English, French, Arabic;
Available link for download
Sunday, March 12, 2017
Hide empty drives in Windows 10 Beginners guide Updated
Hide empty drives in Windows 10 Beginners guide Updated
Hide empty drives in Windows 10 that resides in the computer folder or this PC - Thats what we
gonna see in this post -Works on Windows 10
Creators Update, Windows 10 Anniversary Update, and other editions of Windows like Windows 10
earlier builds like Aug 2015 and Nov 2015 builds.
In our last post, we had seen how to Show hidden folders , in this post lets see how to hide empty drives in Windows 10.
gonna see in this post -Works on Windows 10
Creators Update, Windows 10 Anniversary Update, and other editions of Windows like Windows 10
earlier builds like Aug 2015 and Nov 2015 builds.
In our last post, we had seen how to Show hidden folders , in this post lets see how to hide empty drives in Windows 10.
Do you need any software ??
No, you dont require any software to hide empty drives like System drive or to hide drives with
no media in our windows 10 PC.
no media in our windows 10 PC.
Then, how to do it..?
Just follow the below steps..
Note : There are different steps we can use to hide the empty drive, like using Powershell,
Registry, Command prompt and so on.
Listed, here are the basic steps that doesnt require any knowledge of using Command prompt
commands or powershell commands,
How to hide empty drives or files with no media in Windows 10
Note : There are different steps we can use to hide the empty drive, like using Powershell,
Registry, Command prompt and so on.
Listed, here are the basic steps that doesnt require any knowledge of using Command prompt
commands or powershell commands,
How to hide empty drives or files with no media in Windows 10
1) First, Open your File explorer
If you dont know, how it is , then dont worry, just click on the below helpful link (what is file...)
[Helpful link : What is file explorer and how to open it]
2) When you have opened the file explorer you can find various tabs on the top of the pane
like File, Home, Share, View..
3) Click on the view tab.
4) It will display the Navigation pane and other related options like layout,current view, show or hide, etc..
5) When you are on the step 4, click on the options option
6)Select Change Folder and Search Options.
7) it Will open a New Window named folder options,on that find Click items as follows
Which Will be on View tab.
8) Under Advanced settings, scroll down and find the option "Hide empty drives"
9) Check the box " Hide empty drives"

10) Click on Apply
11) Click on OK.
Thats it..
if the hide empty drives option is not working, then simply restart your PC.
Hope it is helpful.
Thats the end of this post...
Click to read all basic tutorials..
5) When you are on the step 4, click on the options option
6)Select Change Folder and Search Options.
7) it Will open a New Window named folder options,on that find Click items as follows
Which Will be on View tab.
8) Under Advanced settings, scroll down and find the option "Hide empty drives"
9) Check the box " Hide empty drives"
10) Click on Apply
11) Click on OK.
Thats it..
if the hide empty drives option is not working, then simply restart your PC.
Hope it is helpful.
Thats the end of this post...
Click to read all basic tutorials..
Available link for download
Friday, March 10, 2017
Resize live tiles in Windows 10 How to do tutorial
Resize live tiles in Windows 10 How to do tutorial
Resize live tiles in Windows 10 - How to do tutorial thats what we gonna
see in this post - Works on Windows 10 Creators Update, Windows 10
Anniversary Update, and other editions of Windows like Windows 10 earlier builds like Aug 2015
and Nov 2015 builds.
In our last post we had seen how to resize the start screen and how to resize the taskbar in
windows 10. In this post lets see how to resize live tiles in windows 10
Do you any software ?
We dont need an software to resize live tiles in windows 10.
just follow the below steps..
How to resize live tiles in Windows 10
1) Press Windows (logo) key on your keyboard or press start button
2) On, your right pane you will find the live tiles..
[Helpful link : How to turn on or turn off live tiles on windows 10 ]
3) Right click on the live tile
4) You will find many options like Unpin from start,Resize and more...
5) Click on Resize you will see options like small ,medium and large
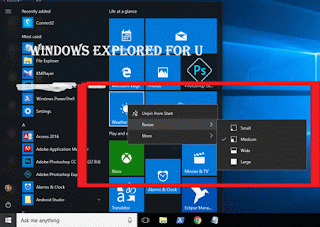
How to resize the live tile to short..
If you wish to make the live tile look smaller, then simply click on small
How to make live tile to wide..
If you wish to make the live tile look wider, then simply follow steps 1 to 5, then
click on wide.
How to make live tile to look large...
If you wish to make the live tile look larger, then simply follow steps 1 to 5, then
click on Large.
How to make live tile to look Medium...
If you wish to make the live tile look medium, then simply follow steps 1 to 5, then
click on Medium.
Thats it..
you had learnt how to resize live tiles in windows 10, which helps in customize start menu of
windows 10.
Hope it is helpful.
Click to see all Windows 10 basic articles..
see in this post - Works on Windows 10 Creators Update, Windows 10
Anniversary Update, and other editions of Windows like Windows 10 earlier builds like Aug 2015
and Nov 2015 builds.
In our last post we had seen how to resize the start screen and how to resize the taskbar in
windows 10. In this post lets see how to resize live tiles in windows 10
Do you any software ?
We dont need an software to resize live tiles in windows 10.
just follow the below steps..
How to resize live tiles in Windows 10
1) Press Windows (logo) key on your keyboard or press start button
2) On, your right pane you will find the live tiles..
[Helpful link : How to turn on or turn off live tiles on windows 10 ]
3) Right click on the live tile
4) You will find many options like Unpin from start,Resize and more...
5) Click on Resize you will see options like small ,medium and large
How to resize the live tile to short..
If you wish to make the live tile look smaller, then simply click on small
How to make live tile to wide..
If you wish to make the live tile look wider, then simply follow steps 1 to 5, then
click on wide.
How to make live tile to look large...
If you wish to make the live tile look larger, then simply follow steps 1 to 5, then
click on Large.
How to make live tile to look Medium...
If you wish to make the live tile look medium, then simply follow steps 1 to 5, then
click on Medium.
Thats it..
you had learnt how to resize live tiles in windows 10, which helps in customize start menu of
windows 10.
Hope it is helpful.
Click to see all Windows 10 basic articles..
Available link for download
How to disable hibernate mode in windows 10 Updated
How to disable hibernate mode in windows 10 Updated
Disable or turn off hibernate mode in windows 10 - thats what we gonna
see in this post - Works on Windows 10 Creators Update, Windows 10
Anniversary Update, and other editions of Windows like Windows 10 earlier builds like Aug 2015
and Nov 2015 builds..
In our last post, we had seen how to enable hibernate mode in windows 10, but it is best practice to
turn off hibernate mode when you are on low disk space..
What happens on hibernation ??
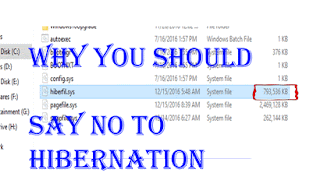
The process involved in hibernation is very vast, but i can explain in some simple words..
When we click hibernate our PC will save the current state of the process running on the device into
a system file called hiberfile.sys which will occupy a large amount of space when we perform
hibernation randomly. we can delete the file by using disk clean up many of us who are beginners
are still unaware of the dangerous side of this hibernation that happens in low end PCs.So its better
to turn it off in Windows 10 when you have low disk space.
But, how?? You will only perform hibernation when you know the right step right? So, here i had
decided to show the way that will hide the hibernation mode which can also be done using
powershell and command prompt...
Lets see how it can be done..
Just follow the below steps..
1) Open Control Panel.
[Helpful link : How to Open control panel in Windows 10 in different ways ]
Step 3 : Click on Hardware and Sound.
Step 4 : Find and Click On Change What the Power buttons do.
"the Option Change What the Power button do Will be Available under Power Options on right pane.
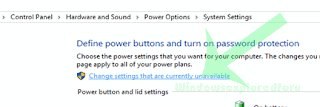
Step 5 : Click on Change Settings that Are unavailable on the Window that Opens.
How to auto Shutdown your Windows 10 PC at particular time??????
see in this post - Works on Windows 10 Creators Update, Windows 10
Anniversary Update, and other editions of Windows like Windows 10 earlier builds like Aug 2015
and Nov 2015 builds..
In our last post, we had seen how to enable hibernate mode in windows 10, but it is best practice to
turn off hibernate mode when you are on low disk space..
What happens on hibernation ??
The process involved in hibernation is very vast, but i can explain in some simple words..
When we click hibernate our PC will save the current state of the process running on the device into
a system file called hiberfile.sys which will occupy a large amount of space when we perform
hibernation randomly. we can delete the file by using disk clean up many of us who are beginners
are still unaware of the dangerous side of this hibernation that happens in low end PCs.So its better
to turn it off in Windows 10 when you have low disk space.
But, how?? You will only perform hibernation when you know the right step right? So, here i had
decided to show the way that will hide the hibernation mode which can also be done using
powershell and command prompt...
Lets see how it can be done..
Just follow the below steps..
1) Open Control Panel.
[Helpful link : How to Open control panel in Windows 10 in different ways ]
Step 3 : Click on Hardware and Sound.
Step 4 : Find and Click On Change What the Power buttons do.
"the Option Change What the Power button do Will be Available under Power Options on right pane.
Step 5 : Click on Change Settings that Are unavailable on the Window that Opens.
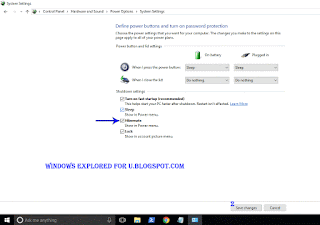
Step 6 : Clicking on it will enable grayed out shutdown settings..
Below the shutdown settings ,you will see various options like Turn on Fast startup, Sleep ,
Hibernate,etc..
Hibernate,etc..
Step 7 : Uncheck the Hibernate option check box.
Step 8 : Click on Save Changes..
Thats it...
Now, visit again your start menu and Shutdown menu, you will see hibernation mode no longer
available in windows 10
available in windows 10
Enjoy..
Other Postss..
Click to see all Windows 10 basic articles..
Available link for download
Thursday, March 9, 2017
Connect to Suggested open hotspot Enable or Disable in Windows 10 Updated
Connect to Suggested open hotspot Enable or Disable in Windows 10 Updated
Connect to Suggested open hotspots in Windows 10 - Thats what we gonna see in this post...
Works on Windows 10
Creators Update, Windows 10 Anniversary Update, and other editions of Windows like Windows 10
earlier builds like Aug 2015 and Nov 2015 builds...
Windows 10 has a built in technology named WiFi sense that will allow your PC to sense the WiFi networks that are open around your PC.
If your PC have WiFi turned on, and there is an open WiFi network appears around your device,
Windows will capture and will examine whether it is safe through internet..
If that was safe, then windows would automatically connect to that hotspot making your device
internet connected.
If you wish to connect to those safe hotspots, that are around your device or if you wish to disable connect to suggested open hotspot option in Windows 10, then here is your guide.
Just follow the steps below on your PC
1) Open settings
2) Click on Network & Internet
3) Click on WiFi tab available on the left pane
4) You can see some options changing on the right pane..

Now , you can see an Option named WiFi sense under that there will be some text " Connect to
suggested open hotspots..
If you wish to turn on Connect to suggested open hotspots..,then
Simply click/tap right side of the option, so that it looks off.
Remember not all networks are secure ????
Thats it..
On the other hand, if you wish to disable wifi sense or want to disable windows 10 automatically
connect to Unknown WiFi networks, then, simply click/tap on the left side of the option, so that it
looks off.
Thats it..
Youre done..
Are you a beginner ? then here are all posts that deals with mastering basics of Windows 10.
Click to see all the basic tutorials
Works on Windows 10
Creators Update, Windows 10 Anniversary Update, and other editions of Windows like Windows 10
earlier builds like Aug 2015 and Nov 2015 builds...
Windows 10 has a built in technology named WiFi sense that will allow your PC to sense the WiFi networks that are open around your PC.
If your PC have WiFi turned on, and there is an open WiFi network appears around your device,
Windows will capture and will examine whether it is safe through internet..
If that was safe, then windows would automatically connect to that hotspot making your device
internet connected.
If you wish to connect to those safe hotspots, that are around your device or if you wish to disable connect to suggested open hotspot option in Windows 10, then here is your guide.
Just follow the steps below on your PC
1) Open settings
2) Click on Network & Internet
3) Click on WiFi tab available on the left pane
4) You can see some options changing on the right pane..
Now , you can see an Option named WiFi sense under that there will be some text " Connect to
suggested open hotspots..
If you wish to turn on Connect to suggested open hotspots..,then
Simply click/tap right side of the option, so that it looks off.
Remember not all networks are secure ????
Thats it..
On the other hand, if you wish to disable wifi sense or want to disable windows 10 automatically
connect to Unknown WiFi networks, then, simply click/tap on the left side of the option, so that it
looks off.
Thats it..
Youre done..
Are you a beginner ? then here are all posts that deals with mastering basics of Windows 10.
Click to see all the basic tutorials
Available link for download
Wednesday, March 8, 2017
Simplix UpdatePack7R2 16 12 22 for Windows 7 SP1 Server 2008 R2 SP1
Simplix UpdatePack7R2 16 12 22 for Windows 7 SP1 Server 2008 R2 SP1

Simplix UpdatePack7R2 for Windows 7 SP1 & Server 2008 R2 SP1 | 66 MB
Masih menggunakan Windows 7 ? atau baru install ulang Windows 7 namun ingin langsung mendapatkan update terbaru Windows 7 tetapi malas mendownload dari Windows Update ? Nah !, kebetulan ada salah satu program Simplix UpdatePack7R2. Fungsi dari Simplix UpdatePack7R2 adalah menginstall Windows Update kedalam Windows 7 SP1 atau Windows Server 2008 R2 SP1, sehingga Windows 7 / Windows Server 2008 R2 kalian akan langsung mendapatkan update terbaru !
Fitur dari Simplix UpdatePack7R diantaranya :
- Bisa digunakan untuk seluruh versi Windows 7 SP1 & juga Windows Server 2008 R2 SP1.
- Bisa digunakan untuk Windows 7 / 2008 R2 versi 32-bit dan 64-bit.
- Bisa digunakan untuk seluruh bahasa Windows.
- Install update tanpa koneksi internet.
- Update yang diinstall hanya berupa update security dan patch. Update optional seperti Get Windows 10 tidak akan diinstall oleh Simplix UpdatePack7R2.
- Mendukung proses installasi melalui perintah CMD.
- Dan masih banyak lagi :)
Jadi, buat kalian yang baru saja menginstall ulang Windows 7 dan ingin segera update ke versi terbaru Windows 7, bisa menggunakan aplikasi yang sangat bermanfaat ini :)
Homepage : http://update7.simplix.info/
Forum : http://forum.oszone.net/thread-257198.html
Changelog 16.12.20 ( Desember 2016 )
Added KB3207752-x86-x64 & KB3210131-x86-x64 to disconnect the telemetry (replaces the KB3072630-x86-x64, KB3108670-x86-x64, KB3164035-x86-x64, KB3185911-x86-x64, KB3197868-x86-x64, KB3163245-x86-x64, KB3188740-x86-x64)
Note :
- Disarankan Windows 7 & Windows Server 2008 R2 kalian sudah terinstall Service Pack 1.
- Saat proses installasi, sebaiknya matikan antivirus !
- Proses installasi akan memakan waktu 30 Menit hingga 1 atau 2 Jam ( tergantung banyaknya update yang terinstall dan kecepatan komputer ).
- Setelah proses update selesai, akan terjadi beberapa kali restart pada PC. Disarankan untuk Backup data penting sebelum install UpdatePack7R2 !
- Setelah proses update selesai, akan terjadi beberapa kali restart pada PC. Disarankan untuk Backup data penting sebelum install UpdatePack7R2 !
DOWNLOAD DISINI
RAR PASSWORD : www.software182.com
Available link for download
Airplane Mode in Windows 10 How to turn on or turn off in Windows 10 in Just 2 steps Updated
Airplane Mode in Windows 10 How to turn on or turn off in Windows 10 in Just 2 steps Updated
Airplane Mode in Windows 10 - How to turn on or turn off in Windows 10 - Thats what we gonna
see in this post - Works on Windows 10
Creators Update, Windows 10 Anniversary Update, and other editions of Windows like Windows 10
earlier builds like Aug 2015 and Nov 2015 builds.
If you are experiencing Airplane Mode issues like struck on Airplane mode, or if you cannot turn off
airplane mode in windows 10 then, i recommend you to follow the steps shown in this guide
[link],else just follow the steps shown in the post..
What is Airplane Mode or flight mode ?
Airplane mode is nothing but the thing used to control our communications. What will happen when
you turned on airplane mode is many things like your Cellular network wont work on PC, you
cannot connect to internet ( WiFi may work sometimes) but basically it is the mode designed to
block all internet connections coming towards your PC.
How to turn on or turn off Airplane mode in Windows 10
If you wish to turn on or turn off airplane mode, then here are the steps..
If you are in earlier windows version build, then refer the steps shown in this article [Link]...
if you are in latest windows build like Windows 10 anniversary Update then, follow the steps below..
How to turn on Airplane mode in Windows 10 Anniversary Update
Note : The UI of Windows 10 doesnt changed much in Windows 10 creators Update as of Dec
19,2016 so you can follow the same steps in Windows 10 Creators update too..
1) Press Windows + I keys.
2) Click on Network and Internet
3) It will open a new window, with status as first option on the left pane.. Find the option called
Airplane Mode (it would be on left pane)
4) Now, on your right pane, you can find " Turn this on to stop all wireless communication, such
as WiFi, cellular, and Bluetooth."
5) Tap on the right side of the option, so that it looks ON.
Thats it..
If, you wish to disable Airplane Mode, then refer the steps below..

How to turn off Airplane mode in Windows 10 Anniversary Update
1) Press Windows + I keys.
2) Click on Network and Internet
3) It will open a new window, with status as first option on the left pane.. Find the option called
Airplane Mode (it would be on left pane)
4) Now, on your right pane, you can find " Turn this on to stop all wireless communication, such
as WiFi, cellular, and Bluetooth."
5) Tap on the left side of the option, so that it looks OFF.
Thats it..
Mmm,???? let me tell you the smart way, just click on the Network/WiFi icon on the Taskbar and
click on Airplane mode,if will turn it on or off there..
see in this post - Works on Windows 10
Creators Update, Windows 10 Anniversary Update, and other editions of Windows like Windows 10
earlier builds like Aug 2015 and Nov 2015 builds.
If you are experiencing Airplane Mode issues like struck on Airplane mode, or if you cannot turn off
airplane mode in windows 10 then, i recommend you to follow the steps shown in this guide
[link],else just follow the steps shown in the post..
What is Airplane Mode or flight mode ?
Airplane mode is nothing but the thing used to control our communications. What will happen when
you turned on airplane mode is many things like your Cellular network wont work on PC, you
cannot connect to internet ( WiFi may work sometimes) but basically it is the mode designed to
block all internet connections coming towards your PC.
How to turn on or turn off Airplane mode in Windows 10
If you wish to turn on or turn off airplane mode, then here are the steps..
If you are in earlier windows version build, then refer the steps shown in this article [Link]...
if you are in latest windows build like Windows 10 anniversary Update then, follow the steps below..
How to turn on Airplane mode in Windows 10 Anniversary Update
Note : The UI of Windows 10 doesnt changed much in Windows 10 creators Update as of Dec
19,2016 so you can follow the same steps in Windows 10 Creators update too..
1) Press Windows + I keys.
2) Click on Network and Internet
3) It will open a new window, with status as first option on the left pane.. Find the option called
Airplane Mode (it would be on left pane)
4) Now, on your right pane, you can find " Turn this on to stop all wireless communication, such
as WiFi, cellular, and Bluetooth."
5) Tap on the right side of the option, so that it looks ON.
Thats it..
If, you wish to disable Airplane Mode, then refer the steps below..
How to turn off Airplane mode in Windows 10 Anniversary Update
1) Press Windows + I keys.
2) Click on Network and Internet
3) It will open a new window, with status as first option on the left pane.. Find the option called
Airplane Mode (it would be on left pane)
4) Now, on your right pane, you can find " Turn this on to stop all wireless communication, such
as WiFi, cellular, and Bluetooth."
5) Tap on the left side of the option, so that it looks OFF.
Thats it..
Mmm,???? let me tell you the smart way, just click on the Network/WiFi icon on the Taskbar and
click on Airplane mode,if will turn it on or off there..
If you are struck on Airplane mode, then see whether my experience help you [How to overcome
struck in Airplane mode in windows 10 Link]
Hope it is helpful.
Thats the end of this post..
Click to read all other tutorials..
Click to read all other tutorials..
Available link for download
Tuesday, March 7, 2017
Aero Glass 1 4 6 1 5 1 for Windows 8 1 Windows 10
Aero Glass 1 4 6 1 5 1 for Windows 8 1 Windows 10

Aero Glass for Windows 8.1 & Windows 10 RS
Aero Glass adalah sebuah program yang berguna untuk mengembalikan Windows Aero kedalam Windows 8.1 dan juga Windows 10. Seperti yang kita tahu, Windows Aero merupakan salah satu fitur yang dihapus oleh Microsoft. Tidak seperti pendahulunya Windows 7 yang sudah memiliki Windows Aero secara default. Aero Glass bisa mengembalikan fitur tersebut dan akan membuat tampilan Windows 8.1 kalian semakin cantik. Saya sendiri pernah me-review AeroGlass disini.
Aero Glass for Win8.1+ v1.4.6 bisa digunakan untuk Windows 8.1 & Windows 10 TH1 Build 10586.
Aero Glass for Win8.1+ v1.5.1 bisa digunakan untuk Windows 10 build 14393.
Aero Glass for Win8.1+ v1.4.6 bisa digunakan untuk Windows 8.1 & Windows 10 TH1 Build 10586.
Aero Glass for Win8.1+ v1.5.1 bisa digunakan untuk Windows 10 build 14393.
SCREENSHOT WINDOWS 8.1

SCREENSHOT WINDOWS 10

DOWNLOAD DISINI
PASSWORD RAR : www.software182.com
Available link for download
Sunday, March 5, 2017
Safe mode in Windows 10 How to enter to safe mode in 2 steps Updated to Windows 10 creators update
Safe mode in Windows 10 How to enter to safe mode in 2 steps Updated to Windows 10 creators update
Safe mode in Windows 10 - how to enter into safe mode in Windows 10 in 2steps works on Windows 10 creators update, windows 10 anniversary update and other builds of Windows 10..
Whenever you are faced with an error what people would instruct you to do is just boot into safe mode and make sure whether it works.. But we never say how to boot into the safe mode. So you guys if you are searching on how to boot into safe mode in your Dell laptop or how to boot into safe mode in HP laptop or on any desktop or laptops, here is your guide....
Do you need any software ??
No, we dont need an software to enter into safe mode...
Then how do it ??
Just follow the below steps..
How to boot into safe mode in Windows 10 on Windows 10 desktop and windows 10 laptop..
I like to point out an important thing..
There are many ways we can use to boot our pc into safe mode like using command prompt, using PowerShell and using registry.. however in this post we are gonna see only the steps on the beginner level, that will work for sure..
The above video is based on safe mode which starts with entering into safe mode..
follow the first few steps shown in the video if you cant find safe mode or if you lost in below step
1) Switch on your PC
2) After your windows boots, you will see the login screen.
3) Now, you can see the power button on the bottom (right corner) of the login screen..
4) click the power button you will see options like shutdown, restart, etc..
Now, hold your shift key on the keyboard and press restart..
5) It will reboot your computer, and will display the advanced options ...
6) select number 4 on the keyboard..
Now, it will boot your PC to safe mode.
Thats it..
Whenever you are faced with an error what people would instruct you to do is just boot into safe mode and make sure whether it works.. But we never say how to boot into the safe mode. So you guys if you are searching on how to boot into safe mode in your Dell laptop or how to boot into safe mode in HP laptop or on any desktop or laptops, here is your guide....
Do you need any software ??
No, we dont need an software to enter into safe mode...
Then how do it ??
Just follow the below steps..
How to boot into safe mode in Windows 10 on Windows 10 desktop and windows 10 laptop..
I like to point out an important thing..
There are many ways we can use to boot our pc into safe mode like using command prompt, using PowerShell and using registry.. however in this post we are gonna see only the steps on the beginner level, that will work for sure..
The above video is based on safe mode which starts with entering into safe mode..
follow the first few steps shown in the video if you cant find safe mode or if you lost in below step
1) Switch on your PC
2) After your windows boots, you will see the login screen.
3) Now, you can see the power button on the bottom (right corner) of the login screen..
4) click the power button you will see options like shutdown, restart, etc..
Now, hold your shift key on the keyboard and press restart..
5) It will reboot your computer, and will display the advanced options ...
6) select number 4 on the keyboard..
Now, it will boot your PC to safe mode.
Thats it..
Available link for download
Saturday, March 4, 2017
Turn off or disable Metered connections in Window 10 we need to do it for Windows 10 Creators Update Guide
Turn off or disable Metered connections in Window 10 we need to do it for Windows 10 Creators Update Guide
Turn off or disable Metered connections in windows 10 - Thats what we gonna see in this post...
Works on Windows 10
Creators Update, Windows 10 Anniversary Update, and other editions of Windows like Windows 10
earlier builds like Aug 2015 and Nov 2015 builds...
In our last post, we had discussed how to turn on metered connections in Windows 10 so that you
can disable or delay updates, Prevent apps from auto downloading,etc..But ,if you have changed
your mind or wish to try the latest windows 10 build then you need to remove metered connections
for windows 10 download that updates. So here is a post, on how to do it..
[Check the above video tutorial,if you wish]
How to disable metered connection in Windows 10
1) Press Windows + I which will open settings.
2) Select Network & Internet.
3) Click on WiFi tab on the left pane.
4) Select Manage known networks option(Which will be on right Pane).
5) It will open a new window,on that click on the Network you wish to turn off metered connection.
6) When you clicked,it will Show Properties and forget, Select Properties.
7) Scroll down and Find Metered connection Slide/Click on left Side of the Option that available
under Metered Connections,show that it shows OFF.
Thats it...
Works on Windows 10
Creators Update, Windows 10 Anniversary Update, and other editions of Windows like Windows 10
earlier builds like Aug 2015 and Nov 2015 builds...
In our last post, we had discussed how to turn on metered connections in Windows 10 so that you
can disable or delay updates, Prevent apps from auto downloading,etc..But ,if you have changed
your mind or wish to try the latest windows 10 build then you need to remove metered connections
for windows 10 download that updates. So here is a post, on how to do it..
[Check the above video tutorial,if you wish]
Do you need any software ?
No, you dont need to download software to disable metered connection in Windows 10, just follow
the below steps..
the below steps..
How to disable metered connection in Windows 10
1) Press Windows + I which will open settings.
2) Select Network & Internet.
3) Click on WiFi tab on the left pane.
4) Select Manage known networks option(Which will be on right Pane).
5) It will open a new window,on that click on the Network you wish to turn off metered connection.
6) When you clicked,it will Show Properties and forget, Select Properties.
7) Scroll down and Find Metered connection Slide/Click on left Side of the Option that available
under Metered Connections,show that it shows OFF.
Thats it...
Are you a beginner ? then here are all posts that deals with mastering basics of Windows 10.
Click to see all the basic tutorials
Click to see all the basic tutorials
Available link for download
How long will take to upgrade to Windows 10 Windows 10 Upgrade FAQ
How long will take to upgrade to Windows 10 Windows 10 Upgrade FAQ
How long will take to upgrade to Windows 10 ? thats what we gonna see in this post...If you have
questions like How long will take to upgrade to Windows 10 from windows 7 or How long will take
to upgrade to Windows 10 from windows 8.1, How long will take to upgrade to Windows 10 from
windows 8 or How long will take to upgrade to Windows 10 Creators Update from Windows 10
Anniversary Update then here is your guide..

For the above question, the answer would be the one..
it depends on your Hardware..
If you have the system configuration required to install Windows 10 [link], then i can say the
windows 10 upgrade will complete within 30 minutes.. But if you are clean installing Windows
10 then the amount of time it takes will be short like 15 minutes.
But, in the mean while if you have some older machines, then it would take some more time.. But it
would complete within 2 - 3 hours..
If you think windows 10 taking forever to install or windows 10 upgrade taking long time that was
more than 4 hours, then what i recommend is to just unplug the USB drive or media that you are
connected and check whether your system meets the minimum configuration windows 10 needs.
If your Windows 10 meets those.. then reinstall the Windows 10
Else, stay on the version of Windows you are using right now..????
questions like How long will take to upgrade to Windows 10 from windows 7 or How long will take
to upgrade to Windows 10 from windows 8.1, How long will take to upgrade to Windows 10 from
windows 8 or How long will take to upgrade to Windows 10 Creators Update from Windows 10
Anniversary Update then here is your guide..
For the above question, the answer would be the one..
it depends on your Hardware..
If you have the system configuration required to install Windows 10 [link], then i can say the
windows 10 upgrade will complete within 30 minutes.. But if you are clean installing Windows
10 then the amount of time it takes will be short like 15 minutes.
But, in the mean while if you have some older machines, then it would take some more time.. But it
would complete within 2 - 3 hours..
If you think windows 10 taking forever to install or windows 10 upgrade taking long time that was
more than 4 hours, then what i recommend is to just unplug the USB drive or media that you are
connected and check whether your system meets the minimum configuration windows 10 needs.
If your Windows 10 meets those.. then reinstall the Windows 10
Else, stay on the version of Windows you are using right now..????
Available link for download
Friday, March 3, 2017
Download Windows 10 Home 32 64 Bit For Free
Download Windows 10 Home 32 64 Bit For Free

Microsoft the biggest company online has now released Windows 10 Home Edition ISO as free download. Windows 10 Home is available in 32 bit and 64 bit ISO and works on any platform or PC. Windows 10 Home free download ISO is latest operating system out at the moment and has been a very big update to Microsofts old operating systems. Windows 10 Home 32 / 64 Bit can be installed easily and only takes minutes if you have the required specifications.
Windows 10 Home was released in 2015 as a major upgrade to Windows 8.1 which was its previous version. Windows 10 Home brings many new changes which were not available in any of its old releases which were in Beta. Windows 10 has a totally new DirectX 12 which has been developed from scratch to provide the highest quality games, movies, videos and audio quality for the user. All new wallpapers are also released alongside Windows 10.
Microsoft Windows 10 Home is unlike any other operating system and has left behind all famous OS including Linux and Mac OS. It also comes with a new browser called Microsoft Edge or Project Spartan it is the new web browser which Microsoft has been working on for a while now and it is amazing and blazing fast in opening web pages and performance. It is known to be faster than Google Chrome and many more.
Windows 10 has a new feature which is called Cortana, it is a digital assistant like Siri and Voice search but for your computer instead of your phone. Cortana can do anything for you by just voice command. It can also set appointments or reminders for you and even can turn on or shut-down, restart your computer. Windows 10 Home Edition is easy to install and setup because it comes with the ISO file.
Windows 10 Home Wallpapers


Recommended Operating Systems from Microsoft
- Windows 7 Ultimate
- Windows 7 Professional
- Windows XP Service Pack 3 ISO
- Windows 10 Basic Edition
Download Details for Windows 10 Home ISO
Available as free to download from Microsoft
Comes in 32 and 64 Bit modes
Platforms supported: Laptops, Desktops and Tablets

Available link for download
Download Paragon HFS for Windows 11 0 0 175 Crack Full Software
Download Paragon HFS for Windows 11 0 0 175 Crack Full Software

Files size : 1 x 26 MB
Media Size : 26 MB
Language : English
Software Description,Features & Whats New :
Experience total communication between Mac & Windows with the industry’s highest performing file system technology. Paragon HFS for Windows is the only solution that provides full read-write access to HFS /HFSX partitions on any type of disks (GPT, MBR) under most of Windows versions. Access Mac-formatted partitions in Windows systems with the fastest and most stable HFS driver on the market.
Available link for download
Touchpad gestures in Windows 10 The gestures that may help you
Touchpad gestures in Windows 10 The gestures that may help you
Touchpad gestures in windows 10 - The most commonly used touchpad gestures that will work
Mostly/only on Windows 10.
Hi, friend welcome to our blog. In our last post we had seen how to enable hibernate in Windows 10.
Today, in this post lets see some of the customization windows 10 sports which will help in
simplifying the usage. When it comes to making our process simpler there comes usage of touch pad.
What is touchpad and where it is located ??

Touchpad are nothing but the mouse we are using in laptops. Windows 10 have a virtual touchpad
in its Windows 10 Creators update. Which will help you to use when our touchpad fails( They are
designed for touch screen PCs),So it wont work on our normal PCs.
So, lets come to the main point..
Here are some of the touchpad gestures that you can use in Windows 10.
Note : The below touchpad gestures will work on any windows 10 laptop,(which means they are
touchpad gestures for windows 10 laptop.) and it was tested working on Hp laptop
When you want to scroll to the top or bottom of the page -> then Simply place your two finger on
the touchpad and move Vertically.
if you want to move the page to top, then simply place two fingers on the touchpad and simply move your hand upwards..
When you want Zoom in or Zoom out -> Simply, place your two fingers on the touchpad and
pinch in or Stretch it out..
When you want to Select an item -> Simply tap on it...
When you want to show the desktop -> Place your three fingers on the touchpad and move simply
swipe or move towards yourself
When you want to open all windows -> Simply, place three fingers on the touchpad and move them
away from you.
When you want to Switch between Windows -> Simply place the three of your fingers and swipe
them either to right side or left side...
Remember, your PC should have touchpad drivers installed for the above tricks to work..
Else, you may say touchpad gestures not working in windows 10. So first install the touchpad
drivers then try it..
This are the most commonly used windows 10 touchpad gestures that you can use it on your
laptop or touchpad.
Mostly/only on Windows 10.
Hi, friend welcome to our blog. In our last post we had seen how to enable hibernate in Windows 10.
Today, in this post lets see some of the customization windows 10 sports which will help in
simplifying the usage. When it comes to making our process simpler there comes usage of touch pad.
What is touchpad and where it is located ??
Touchpad are nothing but the mouse we are using in laptops. Windows 10 have a virtual touchpad
in its Windows 10 Creators update. Which will help you to use when our touchpad fails( They are
designed for touch screen PCs),So it wont work on our normal PCs.
So, lets come to the main point..
Here are some of the touchpad gestures that you can use in Windows 10.
Note : The below touchpad gestures will work on any windows 10 laptop,(which means they are
touchpad gestures for windows 10 laptop.) and it was tested working on Hp laptop
When you want to scroll to the top or bottom of the page -> then Simply place your two finger on
the touchpad and move Vertically.
if you want to move the page to top, then simply place two fingers on the touchpad and simply move your hand upwards..
When you want Zoom in or Zoom out -> Simply, place your two fingers on the touchpad and
pinch in or Stretch it out..
When you want to Select an item -> Simply tap on it...
When you want to show the desktop -> Place your three fingers on the touchpad and move simply
swipe or move towards yourself
When you want to open all windows -> Simply, place three fingers on the touchpad and move them
away from you.
When you want to Switch between Windows -> Simply place the three of your fingers and swipe
them either to right side or left side...
Remember, your PC should have touchpad drivers installed for the above tricks to work..
Else, you may say touchpad gestures not working in windows 10. So first install the touchpad
drivers then try it..
This are the most commonly used windows 10 touchpad gestures that you can use it on your
laptop or touchpad.
Other Postss..
How to auto Shutdown your Windows 10 PC at particular time??????
Click to see all Windows 10 basic articles..
Available link for download
Wednesday, March 1, 2017
Bluetooth doesnt appear on Device Manager of Windows 10 Solved
Bluetooth doesnt appear on Device Manager of Windows 10 Solved
Bluetooth doesnt appear on Device Manager of Windows 10 - After upgrading from Previous
Windows 10 to latest Windows 10 ( Windows 10 Anniversary update to Windows 10 Creators
Update] Fix - Thats what we gonna see in this post.
Works on Windows 10 Creators Update, Windows 10
Anniversary Update, and other editions of Windows like Windows 10 earlier builds like Aug 2015
and Nov 2015 builds.
If your Bluetooth was missing after upgrading to Windows 10, the first solution i recommend was
to search Device manager and Update drives if necessary.

But, what if Bluetooth doesnt appear on device manager ? but you know your device have Bluetooth
because you had connected and transferred files on Previous version of Windows or Windows 10 ????
Dont worry, here is your guide..
[Helpful link : How to check whether my device have bluetooth or not in Windows 10]
1) Open Device Manager.
Dont know, how ?? Dont worry, let me help you. Follow the instructions shown in the below link..
[Helpful link : How to Open Device Manager in Windows 10 [Guide]]
2) Now, you are on device manager, Expand Other devices (or)
3) See, whether you have any Unknown device ( they will have exclamation mark or unknown device text in it)
4) Right click on the Unknown device
5) You will see many options, on that select Properties
6) It will display the properties window, Click on the details tab
7) On the property list, you can find Hardware Ids, click on it / Note it..
The Ids will be usually, look like USBVID_(somevalue).Etc something..
8) Right click on it and select Copy.
9) Now, open your browser and simply paste the ID on any search engine like google or bing
10) Visit the manufacturer website,download and install the latest driver for the device..
Remember that must be compatible to windows 10.
11) Restart Your PC
[ Helpful link : How to restart or reboot windows 10]
Thats it..
It will fix your problem..
Thats the end of this post..
Click to read all basic tutorials..
Windows 10 to latest Windows 10 ( Windows 10 Anniversary update to Windows 10 Creators
Update] Fix - Thats what we gonna see in this post.
Works on Windows 10 Creators Update, Windows 10
Anniversary Update, and other editions of Windows like Windows 10 earlier builds like Aug 2015
and Nov 2015 builds.
If your Bluetooth was missing after upgrading to Windows 10, the first solution i recommend was
to search Device manager and Update drives if necessary.
But, what if Bluetooth doesnt appear on device manager ? but you know your device have Bluetooth
because you had connected and transferred files on Previous version of Windows or Windows 10 ????
Dont worry, here is your guide..
[Helpful link : How to check whether my device have bluetooth or not in Windows 10]
1) Open Device Manager.
Dont know, how ?? Dont worry, let me help you. Follow the instructions shown in the below link..
[Helpful link : How to Open Device Manager in Windows 10 [Guide]]
2) Now, you are on device manager, Expand Other devices (or)
3) See, whether you have any Unknown device ( they will have exclamation mark or unknown device text in it)
4) Right click on the Unknown device
5) You will see many options, on that select Properties
6) It will display the properties window, Click on the details tab
7) On the property list, you can find Hardware Ids, click on it / Note it..
The Ids will be usually, look like USBVID_(somevalue).Etc something..
8) Right click on it and select Copy.
9) Now, open your browser and simply paste the ID on any search engine like google or bing
10) Visit the manufacturer website,download and install the latest driver for the device..
Remember that must be compatible to windows 10.
11) Restart Your PC
[ Helpful link : How to restart or reboot windows 10]
Thats it..
It will fix your problem..
Thats the end of this post..
Click to read all basic tutorials..
Available link for download
Tuesday, February 28, 2017
How do i find my bitlocker Encryption Key to unlock in windows 10 Solved
How do i find my bitlocker Encryption Key to unlock in windows 10 Solved
Find Bitlocker recovery Key - Thats what we are gonna see in our todays post.
Today, while i was having fun with my friend, he accidentally made a bitlocker encryption to one of
his drives. Since, we are in a group talking with each other, he forget to note the recovery key.
He doesnt know what to do next ( Even me too) because the drive has some sensitive info, which we
required in next couple of days. Suddenly we begin to examine every possible solution that we can
use to recover, but most of them went avail. If you are having the same issue, then here is an guide
that may help you.

Solution 1 : Try searching for recovery key.
Windows will prompt you to save your recovery key on a safe place, so check all your drives,plugin in your USB device or external device, chances are you may have transferred it to keep secure..
1) Hit Windows Key
2) Type Recovery key
3) It may pop up on the recovery key on our search result..
Solution 2 : In Microsoft Account
Windows will backup your Bitlocker key on your Microsoft account. So, search on your microsoft account, chances are it is backuped on your Microsoft Account.
Check the below link
http://go.microsoft.com/fwlink/p/?LinkId=237614
Solution 3 : Your Admin
Since Microsoft follows the same method till now, we can see it to our Purpose...
Your PC will have Administrator right ? Ask his/her key and try it.. Trust me it will work if s/he doesnt changed his/her key.
Solution 4 : Using Powershell
This method is my favorite one..But it wont return result to everyone..
Since, Bitlocker is the one that safeguards our drive, try to get the recovery key using it..
{Its like person giving his/her home key to thief, thinking that thief wont steal anything, your PC will give it to you, thinking that its you are requesting the key..}
1) Open Powershell
[See : How to open powershell in Windows 10]
2) Type the following command
Get-BitlockerVolume -Mountpoint (your encrypted drives letter).KeyProtector
for example : if your locked drive was d, type (get-bitlockervolume -mountpoint d).Keyprotector
3) Hit enter,,
it wont work for sure, but give it a try chances are it may work for you.
(or) try Suspend-BitLocker -MountPoint "C:" -RebootCount 0
Replace "C:" with your drive letter
( or) Try this command
Enable-BitLockerAutoUnlock -MountPoint "c:"
Replace E with your drive letter..
The above command will enable auto unlock to your bitlocker, who knows it may work for you too.
Thats it...
If Everything fails...
try to remember every thing you did on that day.. It is possible to recover your data when you have
the memory capacity.
Dont be discouraged.. Sit alone, close your Eyes, try to remember some characters..
Note it down.. No problem whether it is one or two just write it down.
Now, look on your mind again..try to remember again, you will find another any two characters, note that too..
Note the place you think it was for example : the letters you remember may be your last 2 characters.
Just note that down too..
Open command prompt
Type the following command
manage -bde -unlock -certificate -ct thatthingyouwrote -pin yourdriveletter :
Replace the appropriate values..
for example : Manage -bde -unlock -certificate -ct f4cd -pin F:
This is like we are instructing computer to look for certificate that starts with f4cd and unlock it..
2) Hit enter.
(or) Else try this..
Search for online how much a Bitlocker key will have maximum as its characters..
Write every possible combinations that may work and try that things on your Bitlocker.
Believe Our Mind is Much powerful than you think, because its our mind that designed this computers too.
We, as friends used this last method as our PC hadnt connected to internet on that time..,
it worked..
So, dont be discouraged.
Just try it out..
Today, while i was having fun with my friend, he accidentally made a bitlocker encryption to one of
his drives. Since, we are in a group talking with each other, he forget to note the recovery key.
He doesnt know what to do next ( Even me too) because the drive has some sensitive info, which we
required in next couple of days. Suddenly we begin to examine every possible solution that we can
use to recover, but most of them went avail. If you are having the same issue, then here is an guide
that may help you.
Solution 1 : Try searching for recovery key.
Windows will prompt you to save your recovery key on a safe place, so check all your drives,plugin in your USB device or external device, chances are you may have transferred it to keep secure..
1) Hit Windows Key
2) Type Recovery key
3) It may pop up on the recovery key on our search result..
Solution 2 : In Microsoft Account
Windows will backup your Bitlocker key on your Microsoft account. So, search on your microsoft account, chances are it is backuped on your Microsoft Account.
Check the below link
http://go.microsoft.com/fwlink/p/?LinkId=237614
Solution 3 : Your Admin
Since Microsoft follows the same method till now, we can see it to our Purpose...
Your PC will have Administrator right ? Ask his/her key and try it.. Trust me it will work if s/he doesnt changed his/her key.
Solution 4 : Using Powershell
This method is my favorite one..But it wont return result to everyone..
Since, Bitlocker is the one that safeguards our drive, try to get the recovery key using it..
{Its like person giving his/her home key to thief, thinking that thief wont steal anything, your PC will give it to you, thinking that its you are requesting the key..}
1) Open Powershell
[See : How to open powershell in Windows 10]
2) Type the following command
Get-BitlockerVolume -Mountpoint (your encrypted drives letter).KeyProtector
for example : if your locked drive was d, type (get-bitlockervolume -mountpoint d).Keyprotector
3) Hit enter,,
it wont work for sure, but give it a try chances are it may work for you.
(or) try Suspend-BitLocker -MountPoint "C:" -RebootCount 0
Replace "C:" with your drive letter
( or) Try this command
Enable-BitLockerAutoUnlock -MountPoint "c:"
Replace E with your drive letter..
The above command will enable auto unlock to your bitlocker, who knows it may work for you too.
Thats it...
If Everything fails...
try to remember every thing you did on that day.. It is possible to recover your data when you have
the memory capacity.
Dont be discouraged.. Sit alone, close your Eyes, try to remember some characters..
Note it down.. No problem whether it is one or two just write it down.
Now, look on your mind again..try to remember again, you will find another any two characters, note that too..
Note the place you think it was for example : the letters you remember may be your last 2 characters.
Just note that down too..
Open command prompt
Type the following command
manage -bde -unlock -certificate -ct thatthingyouwrote -pin yourdriveletter :
Replace the appropriate values..
for example : Manage -bde -unlock -certificate -ct f4cd -pin F:
This is like we are instructing computer to look for certificate that starts with f4cd and unlock it..
2) Hit enter.
(or) Else try this..
Search for online how much a Bitlocker key will have maximum as its characters..
Write every possible combinations that may work and try that things on your Bitlocker.
Believe Our Mind is Much powerful than you think, because its our mind that designed this computers too.
We, as friends used this last method as our PC hadnt connected to internet on that time..,
it worked..
So, dont be discouraged.
Just try it out..
Available link for download
Subscribe to:
Posts (Atom)