Showing posts with label enable. Show all posts
Showing posts with label enable. Show all posts
Thursday, March 9, 2017
Connect to Suggested open hotspot Enable or Disable in Windows 10 Updated
Connect to Suggested open hotspot Enable or Disable in Windows 10 Updated
Connect to Suggested open hotspots in Windows 10 - Thats what we gonna see in this post...
Works on Windows 10
Creators Update, Windows 10 Anniversary Update, and other editions of Windows like Windows 10
earlier builds like Aug 2015 and Nov 2015 builds...
Windows 10 has a built in technology named WiFi sense that will allow your PC to sense the WiFi networks that are open around your PC.
If your PC have WiFi turned on, and there is an open WiFi network appears around your device,
Windows will capture and will examine whether it is safe through internet..
If that was safe, then windows would automatically connect to that hotspot making your device
internet connected.
If you wish to connect to those safe hotspots, that are around your device or if you wish to disable connect to suggested open hotspot option in Windows 10, then here is your guide.
Just follow the steps below on your PC
1) Open settings
2) Click on Network & Internet
3) Click on WiFi tab available on the left pane
4) You can see some options changing on the right pane..
![Connect to Suggested open hotspot in Windows 10 [Updated]](https://blogger.googleusercontent.com/img/b/R29vZ2xl/AVvXsEjg04CGhAYAM6XXdxJ6pDNh5phzZCFmJOxpdRlsEwxcwpFIGC_OnKpRf0yFu6jfbszgQ0jKEoqMsrmFwrYztdW2PdVDFpJsHgFLavVuX-ebMbRZFkowkM5EHb9gnR30gxxA0DkPFcRPEFg/s320/connect-to-open.gif "Connect to Suggested open hotspot in Windows 10 [Updated]")
Now , you can see an Option named WiFi sense under that there will be some text " Connect to
suggested open hotspots..
If you wish to turn on Connect to suggested open hotspots..,then
Simply click/tap right side of the option, so that it looks off.
Remember not all networks are secure ????
Thats it..
On the other hand, if you wish to disable wifi sense or want to disable windows 10 automatically
connect to Unknown WiFi networks, then, simply click/tap on the left side of the option, so that it
looks off.
Thats it..
Youre done..
Are you a beginner ? then here are all posts that deals with mastering basics of Windows 10.
Click to see all the basic tutorials
Works on Windows 10
Creators Update, Windows 10 Anniversary Update, and other editions of Windows like Windows 10
earlier builds like Aug 2015 and Nov 2015 builds...
Windows 10 has a built in technology named WiFi sense that will allow your PC to sense the WiFi networks that are open around your PC.
If your PC have WiFi turned on, and there is an open WiFi network appears around your device,
Windows will capture and will examine whether it is safe through internet..
If that was safe, then windows would automatically connect to that hotspot making your device
internet connected.
If you wish to connect to those safe hotspots, that are around your device or if you wish to disable connect to suggested open hotspot option in Windows 10, then here is your guide.
Just follow the steps below on your PC
1) Open settings
2) Click on Network & Internet
3) Click on WiFi tab available on the left pane
4) You can see some options changing on the right pane..
Now , you can see an Option named WiFi sense under that there will be some text " Connect to
suggested open hotspots..
If you wish to turn on Connect to suggested open hotspots..,then
Simply click/tap right side of the option, so that it looks off.
Remember not all networks are secure ????
Thats it..
On the other hand, if you wish to disable wifi sense or want to disable windows 10 automatically
connect to Unknown WiFi networks, then, simply click/tap on the left side of the option, so that it
looks off.
Thats it..
Youre done..
Are you a beginner ? then here are all posts that deals with mastering basics of Windows 10.
Click to see all the basic tutorials
Available link for download

Monday, February 27, 2017
How to turn on or enable touchpad gestures in Windows 10 Updated
How to turn on or enable touchpad gestures in Windows 10 Updated
Turn on or enable touchpad gestures in Windows 10 - tutorial that will work on windows 10
creators update, windows 10 anniversary build and other builds of Windows 10.
In our last post, i had explained what is touchpad and how you can use gestures to make your work
simpler. But i hadnt explained how to turn on or enable touchpad gestures in windows 10 .
So, in this post in wish to explain how to turn on touchpad gestures in windows 10.
Do you need any software to turn on or turn off touchpad gestures ?
If you have drivers installed, then you dont need to install anything new..
How to do it ?
Enabling touchpad is very easy process.. Just follow the upcoming steps..
How to Enable touchpad gestures in Windows 10
1) 1) Press Windows + I keys.
2) Click on devices

creators update, windows 10 anniversary build and other builds of Windows 10.
In our last post, i had explained what is touchpad and how you can use gestures to make your work
simpler. But i hadnt explained how to turn on or enable touchpad gestures in windows 10 .
So, in this post in wish to explain how to turn on touchpad gestures in windows 10.
Do you need any software to turn on or turn off touchpad gestures ?
If you have drivers installed, then you dont need to install anything new..
How to do it ?
Enabling touchpad is very easy process.. Just follow the upcoming steps..
How to Enable touchpad gestures in Windows 10
1) 1) Press Windows + I keys.
2) Click on devices
3) It Will open a new window, on that select Mouse and touchpad option.
(Mouse and touchpad option will be available on the left pane)
4) When you clicked, it will open mouse and its settings on the right pane.
5) Now, look for an option called "touchpad" on your right pane, if you have precision touchpad,
then you will see that option.. Simply tap/click on the right side of the option to turn on.
6) But, if you have the non precision laptops then we cant turn it on directly..
The only choice we have is how touchpad gestures will work/ respond..

7) Now, under the touchpad there will be an option called "To prevent the cursor from accidentally moving while you type, change the delay before clicks works" that will help us to choose..
8) Simply, click on the item and set it to No delay or Short delay.
Thats it..
Other related articles :
Touchpad gestures in Windows 10 - The gestures that may help you..
(Mouse and touchpad option will be available on the left pane)
4) When you clicked, it will open mouse and its settings on the right pane.
5) Now, look for an option called "touchpad" on your right pane, if you have precision touchpad,
then you will see that option.. Simply tap/click on the right side of the option to turn on.
6) But, if you have the non precision laptops then we cant turn it on directly..
The only choice we have is how touchpad gestures will work/ respond..
Note :The above screen shot was taken on nonprecision laptop, so you wont see the touchpad option( i said on the above step 5)
on the above screenshot.
7) Now, under the touchpad there will be an option called "To prevent the cursor from accidentally moving while you type, change the delay before clicks works" that will help us to choose..
8) Simply, click on the item and set it to No delay or Short delay.
Thats it..
Other related articles :
Touchpad gestures in Windows 10 - The gestures that may help you..
Available link for download
Saturday, February 18, 2017
How to enable hibernate mode in start menu of Windows 10
How to enable hibernate mode in start menu of Windows 10
Enable or turn on hibernate mode in start menu of Windows 10 - thats what we gonna
see in this post - Works on Windows 10 Creators Update, Windows 10
Anniversary Update, and other editions of Windows like Windows 10 earlier builds like Aug 2015
and Nov 2015 builds.
Recently, one of our blog reader (who wished to stay anonymous) asked me how to enable the
hibernation mode in windows 10.. So in this post lets see how to enable the hibernate button in
Windows 10.
If you are the person searching for a way to fix missing hibernate option in windows 10, or if you
are complaining windows 10 (has) no hibernate option in start menu, then you can enable the
hibernation option by following the steps below.
how to get hibernate option in windows 10
Just follow the steps below..
1) Open Control Panel.
[Helpful link : How to Open control panel in Windows 10 in different ways ]
Step 3 : Click on Hardware and Sound.
Step 4 : Find and Click On Change What the Power buttons do.
"the Option Change What the Power button do Will be Available under Power Options on right pane.
Step 5 : Click on Change Settings that Are unavailable on the Window that Opens.
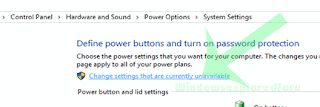
see in this post - Works on Windows 10 Creators Update, Windows 10
Anniversary Update, and other editions of Windows like Windows 10 earlier builds like Aug 2015
and Nov 2015 builds.
Recently, one of our blog reader (who wished to stay anonymous) asked me how to enable the
hibernation mode in windows 10.. So in this post lets see how to enable the hibernate button in
Windows 10.
If you are the person searching for a way to fix missing hibernate option in windows 10, or if you
are complaining windows 10 (has) no hibernate option in start menu, then you can enable the
hibernation option by following the steps below.
how to get hibernate option in windows 10
Just follow the steps below..
1) Open Control Panel.
[Helpful link : How to Open control panel in Windows 10 in different ways ]
Step 3 : Click on Hardware and Sound.
Step 4 : Find and Click On Change What the Power buttons do.
"the Option Change What the Power button do Will be Available under Power Options on right pane.
Step 5 : Click on Change Settings that Are unavailable on the Window that Opens.
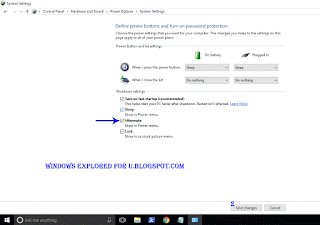
Step 6 : Clicking on it will enable grayed out shutdown settings..
Below the shutdown settings ,you will see various options like Turn on Fast startup, Sleep ,
Hibernate,etc..
Hibernate,etc..
Step 7 : check the Hibernate option check box.
Step 8 : Click on Save Changes..
Thats it...
You had found how to turn on hibernation mode in windows 10, works on all windows 10
laptops and windows 10 desktops..
You had found how to turn on hibernation mode in windows 10, works on all windows 10
laptops and windows 10 desktops..
Other Postss..
Click to see all Windows 10 basic articles..
Available link for download
Thursday, February 9, 2017
Show or enable hidden libraries in File Explorer of Windows 10 Updated
Show or enable hidden libraries in File Explorer of Windows 10 Updated
Show or hide libraries in Windows 10 - If you have question , Does windows 10 have libraries ?
the answer from my side is yes. Probably the next question arise in your mind is then, where
libraries in windows 10 located, where are my libraries or how to enable libraries in file
explorer..
If you have those related questions, then here is an post to explain how to enable or disable libraries
in windows 10 PC - Works on Windows 10 Creators Update, Windows 10
Anniversary Update, and other editions of Windows like Windows 10 earlier builds like Aug 2015
and Nov 2015 builds.


the answer from my side is yes. Probably the next question arise in your mind is then, where
libraries in windows 10 located, where are my libraries or how to enable libraries in file
explorer..
If you have those related questions, then here is an post to explain how to enable or disable libraries
in windows 10 PC - Works on Windows 10 Creators Update, Windows 10
Anniversary Update, and other editions of Windows like Windows 10 earlier builds like Aug 2015
and Nov 2015 builds.
Do you need any software ??
No, you dont require any software to find libraries in windows 10.
Then, how to do it..?
Just follow the below steps..
How to enable hidden libraries in File explorer /Windows explorer of Windows 10
1) First, Open your File explorer
If you dont know, how it is , then dont worry, just click on the below helpful link (what is file...)
[Helpful link : What is file explorer and how to open it]
2) When you have opened the file explorer you can find various tabs on the top of the pane
like File, Home, Share, View..
3) Click on the view tab.
4) It will display the Navigation pane and other related options like layout,current view, show or hide, etc..
5) Click on the Navigation pane..
6) It will display options like Navigation pane, Expand to open folder, show all folders and show libraries.
7) Click on the show libraries option.
Thats it..
You will find your libraries in the file explorer from now..
Note : if your Windows 10 libraries are not working, then try restarting your PC.
Note : if your Windows 10 libraries are not working, then try restarting your PC.
Remember you dont need to download libraries for windows 10 as it is inbuilt in windows 10.
Hope it is helpful
Click to read all basic tutorials..
Hope it is helpful
Click to read all basic tutorials..
Available link for download
Subscribe to:
Posts (Atom)