Showing posts with label disable. Show all posts
Showing posts with label disable. Show all posts
Friday, March 10, 2017
How to disable hibernate mode in windows 10 Updated
How to disable hibernate mode in windows 10 Updated
Disable or turn off hibernate mode in windows 10 - thats what we gonna
see in this post - Works on Windows 10 Creators Update, Windows 10
Anniversary Update, and other editions of Windows like Windows 10 earlier builds like Aug 2015
and Nov 2015 builds..
In our last post, we had seen how to enable hibernate mode in windows 10, but it is best practice to
turn off hibernate mode when you are on low disk space..
What happens on hibernation ??
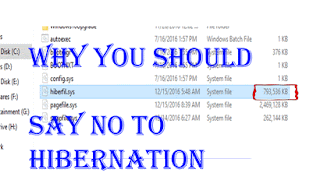
The process involved in hibernation is very vast, but i can explain in some simple words..
When we click hibernate our PC will save the current state of the process running on the device into
a system file called hiberfile.sys which will occupy a large amount of space when we perform
hibernation randomly. we can delete the file by using disk clean up many of us who are beginners
are still unaware of the dangerous side of this hibernation that happens in low end PCs.So its better
to turn it off in Windows 10 when you have low disk space.
But, how?? You will only perform hibernation when you know the right step right? So, here i had
decided to show the way that will hide the hibernation mode which can also be done using
powershell and command prompt...
Lets see how it can be done..
Just follow the below steps..
1) Open Control Panel.
[Helpful link : How to Open control panel in Windows 10 in different ways ]
Step 3 : Click on Hardware and Sound.
Step 4 : Find and Click On Change What the Power buttons do.
"the Option Change What the Power button do Will be Available under Power Options on right pane.
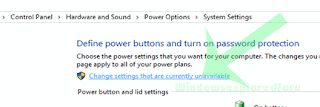
Step 5 : Click on Change Settings that Are unavailable on the Window that Opens.
How to auto Shutdown your Windows 10 PC at particular time??????
see in this post - Works on Windows 10 Creators Update, Windows 10
Anniversary Update, and other editions of Windows like Windows 10 earlier builds like Aug 2015
and Nov 2015 builds..
In our last post, we had seen how to enable hibernate mode in windows 10, but it is best practice to
turn off hibernate mode when you are on low disk space..
What happens on hibernation ??
The process involved in hibernation is very vast, but i can explain in some simple words..
When we click hibernate our PC will save the current state of the process running on the device into
a system file called hiberfile.sys which will occupy a large amount of space when we perform
hibernation randomly. we can delete the file by using disk clean up many of us who are beginners
are still unaware of the dangerous side of this hibernation that happens in low end PCs.So its better
to turn it off in Windows 10 when you have low disk space.
But, how?? You will only perform hibernation when you know the right step right? So, here i had
decided to show the way that will hide the hibernation mode which can also be done using
powershell and command prompt...
Lets see how it can be done..
Just follow the below steps..
1) Open Control Panel.
[Helpful link : How to Open control panel in Windows 10 in different ways ]
Step 3 : Click on Hardware and Sound.
Step 4 : Find and Click On Change What the Power buttons do.
"the Option Change What the Power button do Will be Available under Power Options on right pane.
Step 5 : Click on Change Settings that Are unavailable on the Window that Opens.
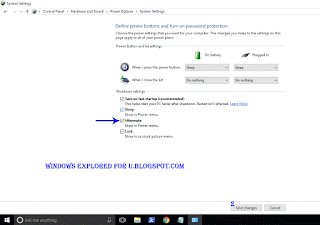
Step 6 : Clicking on it will enable grayed out shutdown settings..
Below the shutdown settings ,you will see various options like Turn on Fast startup, Sleep ,
Hibernate,etc..
Hibernate,etc..
Step 7 : Uncheck the Hibernate option check box.
Step 8 : Click on Save Changes..
Thats it...
Now, visit again your start menu and Shutdown menu, you will see hibernation mode no longer
available in windows 10
available in windows 10
Enjoy..
Other Postss..
Click to see all Windows 10 basic articles..
Available link for download

Thursday, March 9, 2017
Connect to Suggested open hotspot Enable or Disable in Windows 10 Updated
Connect to Suggested open hotspot Enable or Disable in Windows 10 Updated
Connect to Suggested open hotspots in Windows 10 - Thats what we gonna see in this post...
Works on Windows 10
Creators Update, Windows 10 Anniversary Update, and other editions of Windows like Windows 10
earlier builds like Aug 2015 and Nov 2015 builds...
Windows 10 has a built in technology named WiFi sense that will allow your PC to sense the WiFi networks that are open around your PC.
If your PC have WiFi turned on, and there is an open WiFi network appears around your device,
Windows will capture and will examine whether it is safe through internet..
If that was safe, then windows would automatically connect to that hotspot making your device
internet connected.
If you wish to connect to those safe hotspots, that are around your device or if you wish to disable connect to suggested open hotspot option in Windows 10, then here is your guide.
Just follow the steps below on your PC
1) Open settings
2) Click on Network & Internet
3) Click on WiFi tab available on the left pane
4) You can see some options changing on the right pane..
![Connect to Suggested open hotspot in Windows 10 [Updated]](https://blogger.googleusercontent.com/img/b/R29vZ2xl/AVvXsEjg04CGhAYAM6XXdxJ6pDNh5phzZCFmJOxpdRlsEwxcwpFIGC_OnKpRf0yFu6jfbszgQ0jKEoqMsrmFwrYztdW2PdVDFpJsHgFLavVuX-ebMbRZFkowkM5EHb9gnR30gxxA0DkPFcRPEFg/s320/connect-to-open.gif "Connect to Suggested open hotspot in Windows 10 [Updated]")
Now , you can see an Option named WiFi sense under that there will be some text " Connect to
suggested open hotspots..
If you wish to turn on Connect to suggested open hotspots..,then
Simply click/tap right side of the option, so that it looks off.
Remember not all networks are secure ????
Thats it..
On the other hand, if you wish to disable wifi sense or want to disable windows 10 automatically
connect to Unknown WiFi networks, then, simply click/tap on the left side of the option, so that it
looks off.
Thats it..
Youre done..
Are you a beginner ? then here are all posts that deals with mastering basics of Windows 10.
Click to see all the basic tutorials
Works on Windows 10
Creators Update, Windows 10 Anniversary Update, and other editions of Windows like Windows 10
earlier builds like Aug 2015 and Nov 2015 builds...
Windows 10 has a built in technology named WiFi sense that will allow your PC to sense the WiFi networks that are open around your PC.
If your PC have WiFi turned on, and there is an open WiFi network appears around your device,
Windows will capture and will examine whether it is safe through internet..
If that was safe, then windows would automatically connect to that hotspot making your device
internet connected.
If you wish to connect to those safe hotspots, that are around your device or if you wish to disable connect to suggested open hotspot option in Windows 10, then here is your guide.
Just follow the steps below on your PC
1) Open settings
2) Click on Network & Internet
3) Click on WiFi tab available on the left pane
4) You can see some options changing on the right pane..
Now , you can see an Option named WiFi sense under that there will be some text " Connect to
suggested open hotspots..
If you wish to turn on Connect to suggested open hotspots..,then
Simply click/tap right side of the option, so that it looks off.
Remember not all networks are secure ????
Thats it..
On the other hand, if you wish to disable wifi sense or want to disable windows 10 automatically
connect to Unknown WiFi networks, then, simply click/tap on the left side of the option, so that it
looks off.
Thats it..
Youre done..
Are you a beginner ? then here are all posts that deals with mastering basics of Windows 10.
Click to see all the basic tutorials
Available link for download
Saturday, March 4, 2017
Turn off or disable Metered connections in Window 10 we need to do it for Windows 10 Creators Update Guide
Turn off or disable Metered connections in Window 10 we need to do it for Windows 10 Creators Update Guide
Turn off or disable Metered connections in windows 10 - Thats what we gonna see in this post...
Works on Windows 10
Creators Update, Windows 10 Anniversary Update, and other editions of Windows like Windows 10
earlier builds like Aug 2015 and Nov 2015 builds...
In our last post, we had discussed how to turn on metered connections in Windows 10 so that you
can disable or delay updates, Prevent apps from auto downloading,etc..But ,if you have changed
your mind or wish to try the latest windows 10 build then you need to remove metered connections
for windows 10 download that updates. So here is a post, on how to do it..
[Check the above video tutorial,if you wish]
How to disable metered connection in Windows 10
1) Press Windows + I which will open settings.
2) Select Network & Internet.
3) Click on WiFi tab on the left pane.
4) Select Manage known networks option(Which will be on right Pane).
5) It will open a new window,on that click on the Network you wish to turn off metered connection.
6) When you clicked,it will Show Properties and forget, Select Properties.
7) Scroll down and Find Metered connection Slide/Click on left Side of the Option that available
under Metered Connections,show that it shows OFF.
Thats it...
Works on Windows 10
Creators Update, Windows 10 Anniversary Update, and other editions of Windows like Windows 10
earlier builds like Aug 2015 and Nov 2015 builds...
In our last post, we had discussed how to turn on metered connections in Windows 10 so that you
can disable or delay updates, Prevent apps from auto downloading,etc..But ,if you have changed
your mind or wish to try the latest windows 10 build then you need to remove metered connections
for windows 10 download that updates. So here is a post, on how to do it..
[Check the above video tutorial,if you wish]
Do you need any software ?
No, you dont need to download software to disable metered connection in Windows 10, just follow
the below steps..
the below steps..
How to disable metered connection in Windows 10
1) Press Windows + I which will open settings.
2) Select Network & Internet.
3) Click on WiFi tab on the left pane.
4) Select Manage known networks option(Which will be on right Pane).
5) It will open a new window,on that click on the Network you wish to turn off metered connection.
6) When you clicked,it will Show Properties and forget, Select Properties.
7) Scroll down and Find Metered connection Slide/Click on left Side of the Option that available
under Metered Connections,show that it shows OFF.
Thats it...
Are you a beginner ? then here are all posts that deals with mastering basics of Windows 10.
Click to see all the basic tutorials
Click to see all the basic tutorials
Available link for download
Sunday, February 26, 2017
How to turn off or disable sleep mode in Windows 10 Updated Beginners way
How to turn off or disable sleep mode in Windows 10 Updated Beginners way
Turn off or Disable sleep mode in Windows 10 - thats what we gonna
see in this post - Works on Windows 10 Creators Update, Windows 10
Anniversary Update, and other editions of Windows like Windows 10 earlier builds like Aug 2015
and Nov 2015 builds.
Everyday, we are seeing different posts that help beginners alot.. like how to pin an app to start
menu, taskbar and how to unpin the same... In this post lets see how to disable sleep mode in
windows 10.
to disable sleep function or to disable sleep mode in windows 10 , we dont need an software to do
the process, all we need to explore the options which im gonna in this post..
Where is sleep mode located??
See this post which says where you can find the sleep mode settings( will open in new window)..
the above post, shows only where its settings are located, but to turn off or disable sleep mode you
need to follow this post..
How to remove sleep mode from start menu and shutdown menu..
Just follow the below steps..
1) Open Control Panel.
[Helpful link : How to Open control panel in Windows 10 in different ways ]
Step 3 : Click on Hardware and Sound.
Step 4 : Find and Click On Change What the Power buttons do.
"the Option Change What the Power button do Will be Available under Power Options on right pane.
Step 5 : Click on Change Settings that Are unavailable on the Window that Opens.
see in this post - Works on Windows 10 Creators Update, Windows 10
Anniversary Update, and other editions of Windows like Windows 10 earlier builds like Aug 2015
and Nov 2015 builds.
Everyday, we are seeing different posts that help beginners alot.. like how to pin an app to start
menu, taskbar and how to unpin the same... In this post lets see how to disable sleep mode in
windows 10.
to disable sleep function or to disable sleep mode in windows 10 , we dont need an software to do
the process, all we need to explore the options which im gonna in this post..
Where is sleep mode located??
See this post which says where you can find the sleep mode settings( will open in new window)..
the above post, shows only where its settings are located, but to turn off or disable sleep mode you
need to follow this post..
How to remove sleep mode from start menu and shutdown menu..
Just follow the below steps..
1) Open Control Panel.
[Helpful link : How to Open control panel in Windows 10 in different ways ]
Step 3 : Click on Hardware and Sound.
Step 4 : Find and Click On Change What the Power buttons do.
"the Option Change What the Power button do Will be Available under Power Options on right pane.
Step 5 : Click on Change Settings that Are unavailable on the Window that Opens.
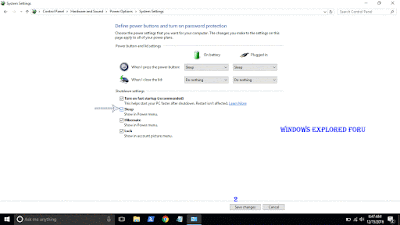
Step 6 : Clicking on it will enable grayed out shutdown settings..
Below the shutdown settings ,you will see various options like Turn on Fast startup, Sleep ,
Hibernate,etc..
Hibernate,etc..
Step 7 : Uncheck the Sleep option check box.
Step 8 : Click on Save Changes..
Thats it...
Now, visit again your start menu.. Boom?? sleep problem will be resolved you will get back your
sleep option, ..
sleep option, ..
Enjoy..
Available link for download
Saturday, February 25, 2017
How to Disable Right Click On Blogger For Images
How to Disable Right Click On Blogger For Images

1. Log in to Blogger And Go to Dashboard > Layout
2. Click Add Gadget And Select HTML/Javascript
3. Copy Paste Below Code.
<script language="JavaScript1.2">Note: You Can Copy This Code From This Link.
var clickmessage="Right click disabled on images!"
function disableclick(e) {
if (document.all) {
if (event.button==2||event.button==3) {
if (event.srcElement.tagName=="IMG"){
alert(clickmessage);
return false;
}
}
}
else if (document.layers) {
if (e.which == 3) {
alert(clickmessage);
return false;
}
}
else if (document.getElementById){
if (e.which==3&&e.target.tagName=="IMG"){
alert(clickmessage)
return false
}
}
}
function associateimages(){
for(i=0;i<document.images.length;i++)
document.images[i].onmousedown=disableclick;
}
if (document.all)
document.onmousedown=disableclick
else if (document.getElementById)
document.onmouseup=disableclick
else if (document.layers)
associateimages()
</script>
4. Now Click On Save Button, You Are Done.
Available link for download
Subscribe to:
Posts (Atom)