Showing posts with label guide. Show all posts
Showing posts with label guide. Show all posts
Sunday, March 12, 2017
Hide empty drives in Windows 10 Beginners guide Updated
Hide empty drives in Windows 10 Beginners guide Updated
Hide empty drives in Windows 10 that resides in the computer folder or this PC - Thats what we
gonna see in this post -Works on Windows 10
Creators Update, Windows 10 Anniversary Update, and other editions of Windows like Windows 10
earlier builds like Aug 2015 and Nov 2015 builds.
In our last post, we had seen how to Show hidden folders , in this post lets see how to hide empty drives in Windows 10.
gonna see in this post -Works on Windows 10
Creators Update, Windows 10 Anniversary Update, and other editions of Windows like Windows 10
earlier builds like Aug 2015 and Nov 2015 builds.
In our last post, we had seen how to Show hidden folders , in this post lets see how to hide empty drives in Windows 10.
Do you need any software ??
No, you dont require any software to hide empty drives like System drive or to hide drives with
no media in our windows 10 PC.
no media in our windows 10 PC.
Then, how to do it..?
Just follow the below steps..
Note : There are different steps we can use to hide the empty drive, like using Powershell,
Registry, Command prompt and so on.
Listed, here are the basic steps that doesnt require any knowledge of using Command prompt
commands or powershell commands,
How to hide empty drives or files with no media in Windows 10
Note : There are different steps we can use to hide the empty drive, like using Powershell,
Registry, Command prompt and so on.
Listed, here are the basic steps that doesnt require any knowledge of using Command prompt
commands or powershell commands,
How to hide empty drives or files with no media in Windows 10
1) First, Open your File explorer
If you dont know, how it is , then dont worry, just click on the below helpful link (what is file...)
[Helpful link : What is file explorer and how to open it]
2) When you have opened the file explorer you can find various tabs on the top of the pane
like File, Home, Share, View..
3) Click on the view tab.
4) It will display the Navigation pane and other related options like layout,current view, show or hide, etc..
5) When you are on the step 4, click on the options option
6)Select Change Folder and Search Options.
7) it Will open a New Window named folder options,on that find Click items as follows
Which Will be on View tab.
8) Under Advanced settings, scroll down and find the option "Hide empty drives"
9) Check the box " Hide empty drives"
![Hide empty drives in Windows 10 - [Beginners guide] [Updated]](https://blogger.googleusercontent.com/img/b/R29vZ2xl/AVvXsEhVDYtyRcgCiSZVT2_1jNiu2fYDkqEqiQOkT9sJducOhIwTZQOxDjrHwks18b8ahFf_3GwWQWxYfYCWxzXLBax8sdv6FYgEVjKX9RCbVzKmrGX_hqhuXQ1ktCIagcGo6kbTWQuXf76Aa-A/s320/hide-empty-drives.gif "Hide empty drives in Windows 10 - [Beginners guide] [Updated]")
10) Click on Apply
11) Click on OK.
Thats it..
if the hide empty drives option is not working, then simply restart your PC.
Hope it is helpful.
Thats the end of this post...
Click to read all basic tutorials..
5) When you are on the step 4, click on the options option
6)Select Change Folder and Search Options.
7) it Will open a New Window named folder options,on that find Click items as follows
Which Will be on View tab.
8) Under Advanced settings, scroll down and find the option "Hide empty drives"
9) Check the box " Hide empty drives"
10) Click on Apply
11) Click on OK.
Thats it..
if the hide empty drives option is not working, then simply restart your PC.
Hope it is helpful.
Thats the end of this post...
Click to read all basic tutorials..
Available link for download

Saturday, March 4, 2017
Turn off or disable Metered connections in Window 10 we need to do it for Windows 10 Creators Update Guide
Turn off or disable Metered connections in Window 10 we need to do it for Windows 10 Creators Update Guide
Turn off or disable Metered connections in windows 10 - Thats what we gonna see in this post...
Works on Windows 10
Creators Update, Windows 10 Anniversary Update, and other editions of Windows like Windows 10
earlier builds like Aug 2015 and Nov 2015 builds...
In our last post, we had discussed how to turn on metered connections in Windows 10 so that you
can disable or delay updates, Prevent apps from auto downloading,etc..But ,if you have changed
your mind or wish to try the latest windows 10 build then you need to remove metered connections
for windows 10 download that updates. So here is a post, on how to do it..
[Check the above video tutorial,if you wish]
How to disable metered connection in Windows 10
1) Press Windows + I which will open settings.
2) Select Network & Internet.
3) Click on WiFi tab on the left pane.
4) Select Manage known networks option(Which will be on right Pane).
5) It will open a new window,on that click on the Network you wish to turn off metered connection.
6) When you clicked,it will Show Properties and forget, Select Properties.
7) Scroll down and Find Metered connection Slide/Click on left Side of the Option that available
under Metered Connections,show that it shows OFF.
Thats it...
Works on Windows 10
Creators Update, Windows 10 Anniversary Update, and other editions of Windows like Windows 10
earlier builds like Aug 2015 and Nov 2015 builds...
In our last post, we had discussed how to turn on metered connections in Windows 10 so that you
can disable or delay updates, Prevent apps from auto downloading,etc..But ,if you have changed
your mind or wish to try the latest windows 10 build then you need to remove metered connections
for windows 10 download that updates. So here is a post, on how to do it..
[Check the above video tutorial,if you wish]
Do you need any software ?
No, you dont need to download software to disable metered connection in Windows 10, just follow
the below steps..
the below steps..
How to disable metered connection in Windows 10
1) Press Windows + I which will open settings.
2) Select Network & Internet.
3) Click on WiFi tab on the left pane.
4) Select Manage known networks option(Which will be on right Pane).
5) It will open a new window,on that click on the Network you wish to turn off metered connection.
6) When you clicked,it will Show Properties and forget, Select Properties.
7) Scroll down and Find Metered connection Slide/Click on left Side of the Option that available
under Metered Connections,show that it shows OFF.
Thats it...
Are you a beginner ? then here are all posts that deals with mastering basics of Windows 10.
Click to see all the basic tutorials
Click to see all the basic tutorials
Available link for download
Thursday, March 2, 2017
Maximum PC Specials – PC How To Guide Summer 2014 PDF Version
Maximum PC Specials – PC How To Guide Summer 2014 PDF Version


Description :
30+ Powerful PC Projects! Get the most out of your PC with these experts tutorials. Secure your PC from attackers. Investigate system hang-ups. Benchmark your rig. Stay anonymous online. Create the ultimate USB toolkit, over 30 easy-to-follow how-tos, and more!
Page : 100
Size : 17.31 MB
To Download (PDF Version) :
MirrorCreator, DirectMirror, DropBox, Box, GoogleDrive
PASSWORD if needed : 1lappybiz
List of hosting site for MirrorCreator and DirectMirror : Click Here
How to download : Click Here
List of hosting site for MirrorCreator and DirectMirror : Click Here
How to download : Click Here
Available link for download
Friday, February 24, 2017
Where is My computer how to open it and restore on desktop in Windows 10 Updated Beginners guide
Where is My computer how to open it and restore on desktop in Windows 10 Updated Beginners guide
How to open my computer in windows 10 - Thats what we gonna see in this post. If you are new
to windows 10 then the first thing you will notice is my computer icon missing in desktop. You
may think about it like where did my desktop go on windows 10,that was working before upgrade
or clean installation. if you are the one who search my computer then
here is an post that will show you how to put my computer on desktop and how to open my
computer in Windows 10. -Works on Windows 10
Creators Update, Windows 10 Anniversary Update, and other editions of Windows like Windows 10
earlier builds like Aug 2015 and Nov 2015 builds.
Where is my computer in Windows 10 ?
First, i like to tell a important note.. there is no my computer and you will no longer find my
computer in windows 10??
just joking., dont be serious.. you wont see the my computer as it is in Windows 10 because they
had renamed the My computer to This PC in Windows 10. So start saying This PC from now on.
How to open my computer in Windows 10 ?
There are many ways you can open my computer or This PC however here is an easiest way to open
my computer in Windows 10.
1) Press Windows Key
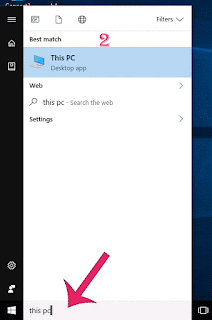
2) Type This PC
3) Select the top most result ( This PC) desktop app
It will open my computer in your PC.
How to get my computer on desktop in windows 10..
We had opened the this PC app, now its time to create shortcut for this PC in desktop
just follow the below steps..
If you wish to create shortcut for my computer to launch on Windows 10, then you are lucky as you
dont need to do some great tasks, all you just need to do is to enable its desktop icon..
if you wish to enable desktop icon for my computer, then simply follow the steps shown in the below
Post.
How to put my computer to desktop [Link]
Thats it..
Using the steps shown in the post, you can pin my computer to desktop or you can put my computer
on any desktop and laptops..
Comment if you have any doubts..
Hope it is helpful.
Are you a beginner ? then here are all posts that deals with mastering basics of Windows 10.
Click to see all the basic tutorials
to windows 10 then the first thing you will notice is my computer icon missing in desktop. You
may think about it like where did my desktop go on windows 10,that was working before upgrade
or clean installation. if you are the one who search my computer then
here is an post that will show you how to put my computer on desktop and how to open my
computer in Windows 10. -Works on Windows 10
Creators Update, Windows 10 Anniversary Update, and other editions of Windows like Windows 10
earlier builds like Aug 2015 and Nov 2015 builds.
Where is my computer in Windows 10 ?
First, i like to tell a important note.. there is no my computer and you will no longer find my
computer in windows 10??
just joking., dont be serious.. you wont see the my computer as it is in Windows 10 because they
had renamed the My computer to This PC in Windows 10. So start saying This PC from now on.
How to open my computer in Windows 10 ?
There are many ways you can open my computer or This PC however here is an easiest way to open
my computer in Windows 10.
1) Press Windows Key
2) Type This PC
3) Select the top most result ( This PC) desktop app
It will open my computer in your PC.
How to get my computer on desktop in windows 10..
We had opened the this PC app, now its time to create shortcut for this PC in desktop
just follow the below steps..
If you wish to create shortcut for my computer to launch on Windows 10, then you are lucky as you
dont need to do some great tasks, all you just need to do is to enable its desktop icon..
if you wish to enable desktop icon for my computer, then simply follow the steps shown in the below
Post.
How to put my computer to desktop [Link]
Thats it..
Using the steps shown in the post, you can pin my computer to desktop or you can put my computer
on any desktop and laptops..
Comment if you have any doubts..
Hope it is helpful.
Are you a beginner ? then here are all posts that deals with mastering basics of Windows 10.
Click to see all the basic tutorials
Available link for download
Wednesday, February 15, 2017
How to find my device have Bluetooth or not in Windows 10 In 2 Steps Beginners guide Updated
How to find my device have Bluetooth or not in Windows 10 In 2 Steps Beginners guide Updated
Check my device have Bluetooth or not in Windows 10 - if you are the one who have questions
like does my computer have bluetooth windows 10 (or) does my laptop have bluetooth
windows 10
(or)
does my pc have bluetooth windows 10(Or) how to know if my computer has bluetooth
windows 10, etc then here is an guide to find your device have Bluetooth capability in Windows 10.
Works on Windows 10 Creators Update, Windows 10
Anniversary Update, and other editions of Windows like Windows 10 earlier builds like Aug 2015
and Nov 2015 builds.

Do we need software ??
No, we dont need an software to find whether your device have bluetooth or not..
Then, how to find it if im a beginner ?
Just follow the below steps..
How to check whether your windows 10 laptop or Windows 10 desktop have Bluetooth or not..
1) First, open device manager on your PC
Dont know, how ?? Dont worry, let me help you. Follow the instructions shown in the below link..
[Helpful link : How to Open Device Manager in Windows 10 [Guide]]
2) When you had Opened device manager, then you will see the list of devices connected to your
device..
Find Whether you have bluetooth text on the device manager box..

If you have Bluetooth text there, your device have Bluetooth facility..If there is no such text,
then your device doesnt have Bluetooth device.
Thats it..
Wait ..! Do you have performed bluetooth transfer before upgrading or does your Manufacturer said, the device have Bluetooth and you cant find it here ?
Dont worry...Follow the Steps shown in this post [Link]
If you want to connect a bluetooth keyboard or Bluetooth mouse , then you need to pair the bluetooth
on Windows 10 first.. Check the below link for details.
[How to connect Bluetooth keyboard and Bluetooth mouse in Windows 10 ]
Are you a beginner ? then here are all posts that deals with mastering basics of Windows 10.
Click to see all the basic tutorials
like does my computer have bluetooth windows 10 (or) does my laptop have bluetooth
windows 10
(or)
does my pc have bluetooth windows 10(Or) how to know if my computer has bluetooth
windows 10, etc then here is an guide to find your device have Bluetooth capability in Windows 10.
Works on Windows 10 Creators Update, Windows 10
Anniversary Update, and other editions of Windows like Windows 10 earlier builds like Aug 2015
and Nov 2015 builds.
Do we need software ??
No, we dont need an software to find whether your device have bluetooth or not..
Then, how to find it if im a beginner ?
Just follow the below steps..
How to check whether your windows 10 laptop or Windows 10 desktop have Bluetooth or not..
1) First, open device manager on your PC
Dont know, how ?? Dont worry, let me help you. Follow the instructions shown in the below link..
[Helpful link : How to Open Device Manager in Windows 10 [Guide]]
2) When you had Opened device manager, then you will see the list of devices connected to your
device..
Find Whether you have bluetooth text on the device manager box..
If you have Bluetooth text there, your device have Bluetooth facility..If there is no such text,
then your device doesnt have Bluetooth device.
Thats it..
Wait ..! Do you have performed bluetooth transfer before upgrading or does your Manufacturer said, the device have Bluetooth and you cant find it here ?
Dont worry...Follow the Steps shown in this post [Link]
If you want to connect a bluetooth keyboard or Bluetooth mouse , then you need to pair the bluetooth
on Windows 10 first.. Check the below link for details.
[How to connect Bluetooth keyboard and Bluetooth mouse in Windows 10 ]
Are you a beginner ? then here are all posts that deals with mastering basics of Windows 10.
Click to see all the basic tutorials
Available link for download
Ultimate guide to Googles Hidden Tools 2013 PDF Version
Ultimate guide to Googles Hidden Tools 2013 PDF Version

427 amazing new tricks youve never tried. Hack Chrome, Gmail and YouTube. Stay anonymous on Google. Speed up everything you do online. 38 pages of brilliant new android apps, tips & reviews and more.
Page : 164
Size : 100.96 MB
To Download (PDF Version) :
Size : 100.96 MB
To Download (PDF Version) :
Mediafire
How to download :
1. Click the link
2. Wait for 5 seconds countdown at the top right side
3. Click Skip Ad
4. Ready to Download
Available link for download
Tuesday, January 31, 2017
How to find all your apps and programs in Windows 10 Beginners guide Updated
How to find all your apps and programs in Windows 10 Beginners guide Updated
How to find programs or applications that installed on my system - thats what we gonna
see in this post - Works on Windows 10 Creators Update, Windows 10
Anniversary Update, and other editions of Windows like Windows 10 earlier builds like Aug 2015
and Nov 2015 builds.
In our last post, we had seen how to pin an application to start menu in windows 10. In this post lets see how to find all programs in Windows 10.
There are couple of ways, we can find program list in windows 10.
However, i like to point out only the basic and most easiest ways in windows 10. So, if you are
looking for where i can find the list of programs installed on my system, then i hope this guide is
helpful for you.
How to find all apps in windows 10 - Method 1
1) Press windows (logo) Key
(or) Press start button.
![How to find all your apps and programs in Windows 10 [Beginners guide] [Updated]](https://blogger.googleusercontent.com/img/b/R29vZ2xl/AVvXsEiDIRe8pdNPX-F7BpTVQ1lHDcpYCnhE2YzaHXKhHgw9Gh65CTo9eVTVIaU-wnhaa0es11GXVPRpbqRj2tquzm7vpmdBoatRLyjfsUDPweI6AT4thbysePrd-Zj03CD9aaP7bDzS8mgi96g/s320/show-list-of-programs-installed.gif "How to find all your apps and programs in Windows 10 [Beginners guide] [Updated]`")
2) You will see all the apps installed on your system including the store apps.
How to find all programs in Windows 10 - Method 2
1) Open control panel
[Helpful link : How to Open control panel in Windows 10 in different ways ]
![How to find all your apps and programs in Windows 10 [Beginners guide] [Updated]](https://blogger.googleusercontent.com/img/b/R29vZ2xl/AVvXsEjA9PO38OfNTuyozoQmRKN8pxUqqu1aDJIhntbeUlEUjU-UTCGDgHho470GZG7RgbxA4EfliKsz27E6UwY1Q-PqkoiwVqtkpqK_2dTSlzidxWHHgRizVrICxc4fDhh4HlFE8rxK5MF2fe4/s320/show-list-of-programs-installed.gif "How to find all your apps and programs in Windows 10 [Beginners guide] [Updated]")
How to auto Shutdown your Windows 10 PC at particular time??????
see in this post - Works on Windows 10 Creators Update, Windows 10
Anniversary Update, and other editions of Windows like Windows 10 earlier builds like Aug 2015
and Nov 2015 builds.
In our last post, we had seen how to pin an application to start menu in windows 10. In this post lets see how to find all programs in Windows 10.
There are couple of ways, we can find program list in windows 10.
However, i like to point out only the basic and most easiest ways in windows 10. So, if you are
looking for where i can find the list of programs installed on my system, then i hope this guide is
helpful for you.
How to find all apps in windows 10 - Method 1
1) Press windows (logo) Key
(or) Press start button.
2) You will see all the apps installed on your system including the store apps.
How to find all programs in Windows 10 - Method 2
1) Open control panel
[Helpful link : How to Open control panel in Windows 10 in different ways ]
2) On the top edge you will find the search box, click on it and type Program and features
3) Click on the Show which program is installed on this system which will be available
in the search result under program and features.
There, you will find the list of programs currently installed on your system
Thats it..
Other Postss..
Click to see all Windows 10 basic articles..
Available link for download
Friday, January 20, 2017
How To Create A Bootable USB To Install Any OS ! Guide
How To Create A Bootable USB To Install Any OS ! Guide

How To Create A Bootable USB To Install Any OS
You have downloaded an ISO file and now you need to create a Bootable USB flash drive using it. So how do you do it?
If you are using Windows, you can use the free Windows USB/DVD download tool provided by Microsoft to create a Bootable USB flash drive using the downloaded ISO file. This tool is only provided with the purpose of creating Bootable USB flash drives for windows operating systems only.
While the tool is able to create Bootable USB flash drives easily, it does has its fare share of problems too. For example, the tool requires you to install Net Framework 2.0 before you install it and even if you do so, the tool is too slow compared to other similar tools available for creating Bootable USB flash drives.
For those who are looking to create Bootable USB flash drive for almost any OS, here a guide that will help you to do it the easy way. Before we proceed with the process of creating an USB flash drive from an ISO file, here are all the things that you will needing in this process.
Download Rufus
Once you have resourced or downloaded the ISO file for the OS that you want to install, you will then need to download a free tool called as Rufus which will help you to create a Bootable USB flash drives from an ISO image.You can download this software from given link below the post
How to Create a Bootable USB Drive for Installing almost any OS
Once you have resourced the ISO file and installed Rufus, you can follow the instructions provided below to create abootable USB Flash Drive.
- Step 1: Run Rufus with administrator rights on Windows
- Step 2: Click on Device and select the USB Flash Drive
- Step 3: For the Partition scheme select any of the following
Select “ MBR partition scheme for BIOS or UEFI computers “ for BIOS boot modeSelect “ GPT partition scheme for UEFI computer ” for UEFI boot mode.
- Step 4: Select the NTFS file system if the ISO file is more than 4GB in size [screenshot]
- Step 5: Leave the cluster size as default.
- Step 6: Under the format options select the following [screenshot]
Select “ Quick Format “Select “ Create extended label and icon files “Select “ Create a bootable disk using “
- Step 7: Click on the drive icon beside “ Create a bootable disk using “ to select the ISO file [screenshot]
- Step 8: Finally verify all the above settings and click on the Start button to write the Bootable ISO onto the USB flash drive [screenshot]
Similarly you can also follow the above steps for creating Bootable USB drives for other operating systems such as Linux and more. One of the best things about Bootable USb flash drives is the free space on the USB drive is usable.
Now you can connect the USB flash drive to your PC and carry on with installing the OS.
List of Operating Systems supported by Rufus
Here is a list of operating systems that are officially supported by Rufus.
Here is a list of operating systems that are officially supported by Rufus.
- Arch Linux
- Archbang
- BartPE/pebuilder
- CentOS
- Damn Small Linux
- Fedora
- FreeDOS
- Gentoo
- GParted
- gNewSense
- Hiren’s Boot CD
- LiveXP
- Knoppix
- KolibriOS
- Kubuntu
- Linux Mint
- NT Password Registry Editor
- OpenSUSE
- Parted Magic
- Partition Wizard
- ReactOS
- rEFInd
- Slackware
- Tails
- Trinity Rescue Kit
- Ubuntu
- Ultimate Boot CD
- Windows XP (SP2+)
- Windows Server 2003 R2
- Windows Vista
- Windows 7
- Windows 8
- Windows 8.1
- Windows 10
Download
Rufus 2.2 for Windows (808 KB)
Available link for download
Subscribe to:
Posts (Atom)