Showing posts with label or. Show all posts
Showing posts with label or. Show all posts
Monday, March 13, 2017
System information in Windows 10 How to check or find your System Information in Windows 10 8 7 In 2 Steps
System information in Windows 10 How to check or find your System Information in Windows 10 8 7 In 2 Steps
System Information in Windows 10 - How to find or check System information using system
information panel in Windows 10 -
Thats what we gonna see in this Post. If you are looking for how to find PC info in windows 10,
Windows 8, Windows 7.
then here is a way to find your System information in Windows 10. - Works on Windows 10 Creators
Update, Windows 10 Anniversary Update and other earlier version of Windows 10.
Do you need software to find System info on Windows 10 ?
No, you dont need to download software to find system info in Windows 10, as it is very simple process..
then, how to find it ?
Its, just a simple process, though there are many methods available to find your system configuration
in windows 10, here i show the simplest method to find system information in windows 10.
How to my System Information in Windows 10..

1) Press Windows + R Keys
2) Type Msinfo32
3) Press Enter
(or) Click OK.
4) It will open a new window, on that window on System Summary , you can find on your system
information.
Thats it..
Hope it is helpful
Are you a beginner ? then, you can check all our Windows 10 basic articles here [Link]
information panel in Windows 10 -
Thats what we gonna see in this Post. If you are looking for how to find PC info in windows 10,
Windows 8, Windows 7.
then here is a way to find your System information in Windows 10. - Works on Windows 10 Creators
Update, Windows 10 Anniversary Update and other earlier version of Windows 10.
Do you need software to find System info on Windows 10 ?
No, you dont need to download software to find system info in Windows 10, as it is very simple process..
then, how to find it ?
Its, just a simple process, though there are many methods available to find your system configuration
in windows 10, here i show the simplest method to find system information in windows 10.
How to my System Information in Windows 10..
1) Press Windows + R Keys
2) Type Msinfo32
3) Press Enter
(or) Click OK.
4) It will open a new window, on that window on System Summary , you can find on your system
information.
Thats it..
Hope it is helpful
Are you a beginner ? then, you can check all our Windows 10 basic articles here [Link]
Available link for download

Thursday, March 9, 2017
Connect to Suggested open hotspot Enable or Disable in Windows 10 Updated
Connect to Suggested open hotspot Enable or Disable in Windows 10 Updated
Connect to Suggested open hotspots in Windows 10 - Thats what we gonna see in this post...
Works on Windows 10
Creators Update, Windows 10 Anniversary Update, and other editions of Windows like Windows 10
earlier builds like Aug 2015 and Nov 2015 builds...
Windows 10 has a built in technology named WiFi sense that will allow your PC to sense the WiFi networks that are open around your PC.
If your PC have WiFi turned on, and there is an open WiFi network appears around your device,
Windows will capture and will examine whether it is safe through internet..
If that was safe, then windows would automatically connect to that hotspot making your device
internet connected.
If you wish to connect to those safe hotspots, that are around your device or if you wish to disable connect to suggested open hotspot option in Windows 10, then here is your guide.
Just follow the steps below on your PC
1) Open settings
2) Click on Network & Internet
3) Click on WiFi tab available on the left pane
4) You can see some options changing on the right pane..

Now , you can see an Option named WiFi sense under that there will be some text " Connect to
suggested open hotspots..
If you wish to turn on Connect to suggested open hotspots..,then
Simply click/tap right side of the option, so that it looks off.
Remember not all networks are secure ????
Thats it..
On the other hand, if you wish to disable wifi sense or want to disable windows 10 automatically
connect to Unknown WiFi networks, then, simply click/tap on the left side of the option, so that it
looks off.
Thats it..
Youre done..
Are you a beginner ? then here are all posts that deals with mastering basics of Windows 10.
Click to see all the basic tutorials
Works on Windows 10
Creators Update, Windows 10 Anniversary Update, and other editions of Windows like Windows 10
earlier builds like Aug 2015 and Nov 2015 builds...
Windows 10 has a built in technology named WiFi sense that will allow your PC to sense the WiFi networks that are open around your PC.
If your PC have WiFi turned on, and there is an open WiFi network appears around your device,
Windows will capture and will examine whether it is safe through internet..
If that was safe, then windows would automatically connect to that hotspot making your device
internet connected.
If you wish to connect to those safe hotspots, that are around your device or if you wish to disable connect to suggested open hotspot option in Windows 10, then here is your guide.
Just follow the steps below on your PC
1) Open settings
2) Click on Network & Internet
3) Click on WiFi tab available on the left pane
4) You can see some options changing on the right pane..
Now , you can see an Option named WiFi sense under that there will be some text " Connect to
suggested open hotspots..
If you wish to turn on Connect to suggested open hotspots..,then
Simply click/tap right side of the option, so that it looks off.
Remember not all networks are secure ????
Thats it..
On the other hand, if you wish to disable wifi sense or want to disable windows 10 automatically
connect to Unknown WiFi networks, then, simply click/tap on the left side of the option, so that it
looks off.
Thats it..
Youre done..
Are you a beginner ? then here are all posts that deals with mastering basics of Windows 10.
Click to see all the basic tutorials
Available link for download
Wednesday, March 8, 2017
Airplane Mode in Windows 10 How to turn on or turn off in Windows 10 in Just 2 steps Updated
Airplane Mode in Windows 10 How to turn on or turn off in Windows 10 in Just 2 steps Updated
Airplane Mode in Windows 10 - How to turn on or turn off in Windows 10 - Thats what we gonna
see in this post - Works on Windows 10
Creators Update, Windows 10 Anniversary Update, and other editions of Windows like Windows 10
earlier builds like Aug 2015 and Nov 2015 builds.
If you are experiencing Airplane Mode issues like struck on Airplane mode, or if you cannot turn off
airplane mode in windows 10 then, i recommend you to follow the steps shown in this guide
[link],else just follow the steps shown in the post..
What is Airplane Mode or flight mode ?
Airplane mode is nothing but the thing used to control our communications. What will happen when
you turned on airplane mode is many things like your Cellular network wont work on PC, you
cannot connect to internet ( WiFi may work sometimes) but basically it is the mode designed to
block all internet connections coming towards your PC.
How to turn on or turn off Airplane mode in Windows 10
If you wish to turn on or turn off airplane mode, then here are the steps..
If you are in earlier windows version build, then refer the steps shown in this article [Link]...
if you are in latest windows build like Windows 10 anniversary Update then, follow the steps below..
How to turn on Airplane mode in Windows 10 Anniversary Update
Note : The UI of Windows 10 doesnt changed much in Windows 10 creators Update as of Dec
19,2016 so you can follow the same steps in Windows 10 Creators update too..
1) Press Windows + I keys.
2) Click on Network and Internet
3) It will open a new window, with status as first option on the left pane.. Find the option called
Airplane Mode (it would be on left pane)
4) Now, on your right pane, you can find " Turn this on to stop all wireless communication, such
as WiFi, cellular, and Bluetooth."
5) Tap on the right side of the option, so that it looks ON.
Thats it..
If, you wish to disable Airplane Mode, then refer the steps below..

How to turn off Airplane mode in Windows 10 Anniversary Update
1) Press Windows + I keys.
2) Click on Network and Internet
3) It will open a new window, with status as first option on the left pane.. Find the option called
Airplane Mode (it would be on left pane)
4) Now, on your right pane, you can find " Turn this on to stop all wireless communication, such
as WiFi, cellular, and Bluetooth."
5) Tap on the left side of the option, so that it looks OFF.
Thats it..
Mmm,???? let me tell you the smart way, just click on the Network/WiFi icon on the Taskbar and
click on Airplane mode,if will turn it on or off there..
see in this post - Works on Windows 10
Creators Update, Windows 10 Anniversary Update, and other editions of Windows like Windows 10
earlier builds like Aug 2015 and Nov 2015 builds.
If you are experiencing Airplane Mode issues like struck on Airplane mode, or if you cannot turn off
airplane mode in windows 10 then, i recommend you to follow the steps shown in this guide
[link],else just follow the steps shown in the post..
What is Airplane Mode or flight mode ?
Airplane mode is nothing but the thing used to control our communications. What will happen when
you turned on airplane mode is many things like your Cellular network wont work on PC, you
cannot connect to internet ( WiFi may work sometimes) but basically it is the mode designed to
block all internet connections coming towards your PC.
How to turn on or turn off Airplane mode in Windows 10
If you wish to turn on or turn off airplane mode, then here are the steps..
If you are in earlier windows version build, then refer the steps shown in this article [Link]...
if you are in latest windows build like Windows 10 anniversary Update then, follow the steps below..
How to turn on Airplane mode in Windows 10 Anniversary Update
Note : The UI of Windows 10 doesnt changed much in Windows 10 creators Update as of Dec
19,2016 so you can follow the same steps in Windows 10 Creators update too..
1) Press Windows + I keys.
2) Click on Network and Internet
3) It will open a new window, with status as first option on the left pane.. Find the option called
Airplane Mode (it would be on left pane)
4) Now, on your right pane, you can find " Turn this on to stop all wireless communication, such
as WiFi, cellular, and Bluetooth."
5) Tap on the right side of the option, so that it looks ON.
Thats it..
If, you wish to disable Airplane Mode, then refer the steps below..
How to turn off Airplane mode in Windows 10 Anniversary Update
1) Press Windows + I keys.
2) Click on Network and Internet
3) It will open a new window, with status as first option on the left pane.. Find the option called
Airplane Mode (it would be on left pane)
4) Now, on your right pane, you can find " Turn this on to stop all wireless communication, such
as WiFi, cellular, and Bluetooth."
5) Tap on the left side of the option, so that it looks OFF.
Thats it..
Mmm,???? let me tell you the smart way, just click on the Network/WiFi icon on the Taskbar and
click on Airplane mode,if will turn it on or off there..
If you are struck on Airplane mode, then see whether my experience help you [How to overcome
struck in Airplane mode in windows 10 Link]
Hope it is helpful.
Thats the end of this post..
Click to read all other tutorials..
Click to read all other tutorials..
Available link for download
Saturday, March 4, 2017
Turn off or disable Metered connections in Window 10 we need to do it for Windows 10 Creators Update Guide
Turn off or disable Metered connections in Window 10 we need to do it for Windows 10 Creators Update Guide
Turn off or disable Metered connections in windows 10 - Thats what we gonna see in this post...
Works on Windows 10
Creators Update, Windows 10 Anniversary Update, and other editions of Windows like Windows 10
earlier builds like Aug 2015 and Nov 2015 builds...
In our last post, we had discussed how to turn on metered connections in Windows 10 so that you
can disable or delay updates, Prevent apps from auto downloading,etc..But ,if you have changed
your mind or wish to try the latest windows 10 build then you need to remove metered connections
for windows 10 download that updates. So here is a post, on how to do it..
[Check the above video tutorial,if you wish]
How to disable metered connection in Windows 10
1) Press Windows + I which will open settings.
2) Select Network & Internet.
3) Click on WiFi tab on the left pane.
4) Select Manage known networks option(Which will be on right Pane).
5) It will open a new window,on that click on the Network you wish to turn off metered connection.
6) When you clicked,it will Show Properties and forget, Select Properties.
7) Scroll down and Find Metered connection Slide/Click on left Side of the Option that available
under Metered Connections,show that it shows OFF.
Thats it...
Works on Windows 10
Creators Update, Windows 10 Anniversary Update, and other editions of Windows like Windows 10
earlier builds like Aug 2015 and Nov 2015 builds...
In our last post, we had discussed how to turn on metered connections in Windows 10 so that you
can disable or delay updates, Prevent apps from auto downloading,etc..But ,if you have changed
your mind or wish to try the latest windows 10 build then you need to remove metered connections
for windows 10 download that updates. So here is a post, on how to do it..
[Check the above video tutorial,if you wish]
Do you need any software ?
No, you dont need to download software to disable metered connection in Windows 10, just follow
the below steps..
the below steps..
How to disable metered connection in Windows 10
1) Press Windows + I which will open settings.
2) Select Network & Internet.
3) Click on WiFi tab on the left pane.
4) Select Manage known networks option(Which will be on right Pane).
5) It will open a new window,on that click on the Network you wish to turn off metered connection.
6) When you clicked,it will Show Properties and forget, Select Properties.
7) Scroll down and Find Metered connection Slide/Click on left Side of the Option that available
under Metered Connections,show that it shows OFF.
Thats it...
Are you a beginner ? then here are all posts that deals with mastering basics of Windows 10.
Click to see all the basic tutorials
Click to see all the basic tutorials
Available link for download
Monday, February 27, 2017
How to turn on or enable touchpad gestures in Windows 10 Updated
How to turn on or enable touchpad gestures in Windows 10 Updated
Turn on or enable touchpad gestures in Windows 10 - tutorial that will work on windows 10
creators update, windows 10 anniversary build and other builds of Windows 10.
In our last post, i had explained what is touchpad and how you can use gestures to make your work
simpler. But i hadnt explained how to turn on or enable touchpad gestures in windows 10 .
So, in this post in wish to explain how to turn on touchpad gestures in windows 10.
Do you need any software to turn on or turn off touchpad gestures ?
If you have drivers installed, then you dont need to install anything new..
How to do it ?
Enabling touchpad is very easy process.. Just follow the upcoming steps..
How to Enable touchpad gestures in Windows 10
1) 1) Press Windows + I keys.
2) Click on devices

creators update, windows 10 anniversary build and other builds of Windows 10.
In our last post, i had explained what is touchpad and how you can use gestures to make your work
simpler. But i hadnt explained how to turn on or enable touchpad gestures in windows 10 .
So, in this post in wish to explain how to turn on touchpad gestures in windows 10.
Do you need any software to turn on or turn off touchpad gestures ?
If you have drivers installed, then you dont need to install anything new..
How to do it ?
Enabling touchpad is very easy process.. Just follow the upcoming steps..
How to Enable touchpad gestures in Windows 10
1) 1) Press Windows + I keys.
2) Click on devices
3) It Will open a new window, on that select Mouse and touchpad option.
(Mouse and touchpad option will be available on the left pane)
4) When you clicked, it will open mouse and its settings on the right pane.
5) Now, look for an option called "touchpad" on your right pane, if you have precision touchpad,
then you will see that option.. Simply tap/click on the right side of the option to turn on.
6) But, if you have the non precision laptops then we cant turn it on directly..
The only choice we have is how touchpad gestures will work/ respond..

7) Now, under the touchpad there will be an option called "To prevent the cursor from accidentally moving while you type, change the delay before clicks works" that will help us to choose..
8) Simply, click on the item and set it to No delay or Short delay.
Thats it..
Other related articles :
Touchpad gestures in Windows 10 - The gestures that may help you..
(Mouse and touchpad option will be available on the left pane)
4) When you clicked, it will open mouse and its settings on the right pane.
5) Now, look for an option called "touchpad" on your right pane, if you have precision touchpad,
then you will see that option.. Simply tap/click on the right side of the option to turn on.
6) But, if you have the non precision laptops then we cant turn it on directly..
The only choice we have is how touchpad gestures will work/ respond..
Note :The above screen shot was taken on nonprecision laptop, so you wont see the touchpad option( i said on the above step 5)
on the above screenshot.
7) Now, under the touchpad there will be an option called "To prevent the cursor from accidentally moving while you type, change the delay before clicks works" that will help us to choose..
8) Simply, click on the item and set it to No delay or Short delay.
Thats it..
Other related articles :
Touchpad gestures in Windows 10 - The gestures that may help you..
Available link for download
Sunday, February 26, 2017
How to turn off or disable sleep mode in Windows 10 Updated Beginners way
How to turn off or disable sleep mode in Windows 10 Updated Beginners way
Turn off or Disable sleep mode in Windows 10 - thats what we gonna
see in this post - Works on Windows 10 Creators Update, Windows 10
Anniversary Update, and other editions of Windows like Windows 10 earlier builds like Aug 2015
and Nov 2015 builds.
Everyday, we are seeing different posts that help beginners alot.. like how to pin an app to start
menu, taskbar and how to unpin the same... In this post lets see how to disable sleep mode in
windows 10.
to disable sleep function or to disable sleep mode in windows 10 , we dont need an software to do
the process, all we need to explore the options which im gonna in this post..
Where is sleep mode located??
See this post which says where you can find the sleep mode settings( will open in new window)..
the above post, shows only where its settings are located, but to turn off or disable sleep mode you
need to follow this post..
How to remove sleep mode from start menu and shutdown menu..
Just follow the below steps..
1) Open Control Panel.
[Helpful link : How to Open control panel in Windows 10 in different ways ]
Step 3 : Click on Hardware and Sound.
Step 4 : Find and Click On Change What the Power buttons do.
"the Option Change What the Power button do Will be Available under Power Options on right pane.
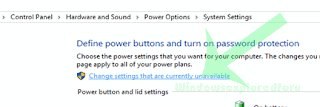
Step 5 : Click on Change Settings that Are unavailable on the Window that Opens.
see in this post - Works on Windows 10 Creators Update, Windows 10
Anniversary Update, and other editions of Windows like Windows 10 earlier builds like Aug 2015
and Nov 2015 builds.
Everyday, we are seeing different posts that help beginners alot.. like how to pin an app to start
menu, taskbar and how to unpin the same... In this post lets see how to disable sleep mode in
windows 10.
to disable sleep function or to disable sleep mode in windows 10 , we dont need an software to do
the process, all we need to explore the options which im gonna in this post..
Where is sleep mode located??
See this post which says where you can find the sleep mode settings( will open in new window)..
the above post, shows only where its settings are located, but to turn off or disable sleep mode you
need to follow this post..
How to remove sleep mode from start menu and shutdown menu..
Just follow the below steps..
1) Open Control Panel.
[Helpful link : How to Open control panel in Windows 10 in different ways ]
Step 3 : Click on Hardware and Sound.
Step 4 : Find and Click On Change What the Power buttons do.
"the Option Change What the Power button do Will be Available under Power Options on right pane.
Step 5 : Click on Change Settings that Are unavailable on the Window that Opens.
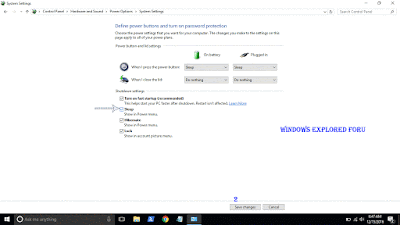
Step 6 : Clicking on it will enable grayed out shutdown settings..
Below the shutdown settings ,you will see various options like Turn on Fast startup, Sleep ,
Hibernate,etc..
Hibernate,etc..
Step 7 : Uncheck the Sleep option check box.
Step 8 : Click on Save Changes..
Thats it...
Now, visit again your start menu.. Boom?? sleep problem will be resolved you will get back your
sleep option, ..
sleep option, ..
Enjoy..
Available link for download
Create bootable USB drives to install windows 7 windows 8 or 8 1
Create bootable USB drives to install windows 7 windows 8 or 8 1

Rufus is a utility that helps format and create bootable USB flash drives, such as USB keys/pendrives, memory sticks, etc.
It can be especially useful for cases where:
you need to create USB installation media from bootable ISOs (Windows, Linux, UEFI, etc.)Despite its small size, Rufus provides everything you need!
you need to work on a system that doesnt have an OS installed
you need to flash a BIOS or other firmware from DOS
you want to run a low-level utility
Instructions to create a bootable Windows 8.1 USB Flash drive
- Step 1: Download and run Rufus
- Step 2: From the device drop down menu select your USB flash drive
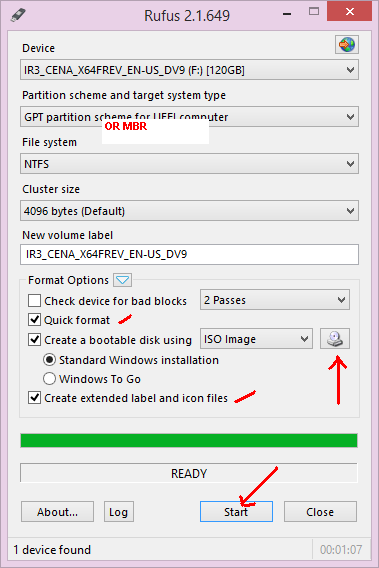
- Step 3: For partition scheme . Select “ GPT partitionscheme for UEFI computer “ if you have a UEFI enabled Bios , otherwise select “ MBR partition scheme for BIOS and UEFI computer “ .
- Step 4: For file system select Fat 32 if your windows 8.1 ISO file size is below 4 GB else choose NTFS . For a UEFI bios it is compulsory to have a FAT32 file system .
- Step 5: Leave the cluster size at default and check the quick format option .
- Step 6: check “ create a bootable disk using “ and select ISO image and select the Windows 8.1 ISO image .
- Step 7: Check “ create extendable label and icon “
- Step 8: Now click on start to create your bootable Windows 8.1 USB flash drive .
Available link for download
Wednesday, February 15, 2017
How to find my device have Bluetooth or not in Windows 10 In 2 Steps Beginners guide Updated
How to find my device have Bluetooth or not in Windows 10 In 2 Steps Beginners guide Updated
Check my device have Bluetooth or not in Windows 10 - if you are the one who have questions
like does my computer have bluetooth windows 10 (or) does my laptop have bluetooth
windows 10
(or)
does my pc have bluetooth windows 10(Or) how to know if my computer has bluetooth
windows 10, etc then here is an guide to find your device have Bluetooth capability in Windows 10.
Works on Windows 10 Creators Update, Windows 10
Anniversary Update, and other editions of Windows like Windows 10 earlier builds like Aug 2015
and Nov 2015 builds.

Do we need software ??
No, we dont need an software to find whether your device have bluetooth or not..
Then, how to find it if im a beginner ?
Just follow the below steps..
How to check whether your windows 10 laptop or Windows 10 desktop have Bluetooth or not..
1) First, open device manager on your PC
Dont know, how ?? Dont worry, let me help you. Follow the instructions shown in the below link..
[Helpful link : How to Open Device Manager in Windows 10 [Guide]]
2) When you had Opened device manager, then you will see the list of devices connected to your
device..
Find Whether you have bluetooth text on the device manager box..

If you have Bluetooth text there, your device have Bluetooth facility..If there is no such text,
then your device doesnt have Bluetooth device.
Thats it..
Wait ..! Do you have performed bluetooth transfer before upgrading or does your Manufacturer said, the device have Bluetooth and you cant find it here ?
Dont worry...Follow the Steps shown in this post [Link]
If you want to connect a bluetooth keyboard or Bluetooth mouse , then you need to pair the bluetooth
on Windows 10 first.. Check the below link for details.
[How to connect Bluetooth keyboard and Bluetooth mouse in Windows 10 ]
Are you a beginner ? then here are all posts that deals with mastering basics of Windows 10.
Click to see all the basic tutorials
like does my computer have bluetooth windows 10 (or) does my laptop have bluetooth
windows 10
(or)
does my pc have bluetooth windows 10(Or) how to know if my computer has bluetooth
windows 10, etc then here is an guide to find your device have Bluetooth capability in Windows 10.
Works on Windows 10 Creators Update, Windows 10
Anniversary Update, and other editions of Windows like Windows 10 earlier builds like Aug 2015
and Nov 2015 builds.
Do we need software ??
No, we dont need an software to find whether your device have bluetooth or not..
Then, how to find it if im a beginner ?
Just follow the below steps..
How to check whether your windows 10 laptop or Windows 10 desktop have Bluetooth or not..
1) First, open device manager on your PC
Dont know, how ?? Dont worry, let me help you. Follow the instructions shown in the below link..
[Helpful link : How to Open Device Manager in Windows 10 [Guide]]
2) When you had Opened device manager, then you will see the list of devices connected to your
device..
Find Whether you have bluetooth text on the device manager box..
If you have Bluetooth text there, your device have Bluetooth facility..If there is no such text,
then your device doesnt have Bluetooth device.
Thats it..
Wait ..! Do you have performed bluetooth transfer before upgrading or does your Manufacturer said, the device have Bluetooth and you cant find it here ?
Dont worry...Follow the Steps shown in this post [Link]
If you want to connect a bluetooth keyboard or Bluetooth mouse , then you need to pair the bluetooth
on Windows 10 first.. Check the below link for details.
[How to connect Bluetooth keyboard and Bluetooth mouse in Windows 10 ]
Are you a beginner ? then here are all posts that deals with mastering basics of Windows 10.
Click to see all the basic tutorials
Available link for download
Thursday, February 9, 2017
Show or enable hidden libraries in File Explorer of Windows 10 Updated
Show or enable hidden libraries in File Explorer of Windows 10 Updated
Show or hide libraries in Windows 10 - If you have question , Does windows 10 have libraries ?
the answer from my side is yes. Probably the next question arise in your mind is then, where
libraries in windows 10 located, where are my libraries or how to enable libraries in file
explorer..
If you have those related questions, then here is an post to explain how to enable or disable libraries
in windows 10 PC - Works on Windows 10 Creators Update, Windows 10
Anniversary Update, and other editions of Windows like Windows 10 earlier builds like Aug 2015
and Nov 2015 builds.


the answer from my side is yes. Probably the next question arise in your mind is then, where
libraries in windows 10 located, where are my libraries or how to enable libraries in file
explorer..
If you have those related questions, then here is an post to explain how to enable or disable libraries
in windows 10 PC - Works on Windows 10 Creators Update, Windows 10
Anniversary Update, and other editions of Windows like Windows 10 earlier builds like Aug 2015
and Nov 2015 builds.
Do you need any software ??
No, you dont require any software to find libraries in windows 10.
Then, how to do it..?
Just follow the below steps..
How to enable hidden libraries in File explorer /Windows explorer of Windows 10
1) First, Open your File explorer
If you dont know, how it is , then dont worry, just click on the below helpful link (what is file...)
[Helpful link : What is file explorer and how to open it]
2) When you have opened the file explorer you can find various tabs on the top of the pane
like File, Home, Share, View..
3) Click on the view tab.
4) It will display the Navigation pane and other related options like layout,current view, show or hide, etc..
5) Click on the Navigation pane..
6) It will display options like Navigation pane, Expand to open folder, show all folders and show libraries.
7) Click on the show libraries option.
Thats it..
You will find your libraries in the file explorer from now..
Note : if your Windows 10 libraries are not working, then try restarting your PC.
Note : if your Windows 10 libraries are not working, then try restarting your PC.
Remember you dont need to download libraries for windows 10 as it is inbuilt in windows 10.
Hope it is helpful
Click to read all basic tutorials..
Hope it is helpful
Click to read all basic tutorials..
Available link for download
Monday, January 16, 2017
Hide or Remove OneDrive icon from file explorer in Windows 10 Updated
Hide or Remove OneDrive icon from file explorer in Windows 10 Updated
Hide or Remove OneDrive icon from File Explorer in Windows 10 - thats what we gonna
see in this post - Works on Windows 10 Creators Update, Windows 10
Anniversary Update, and other editions of Windows like Windows 10 earlier builds like Aug 2015
and Nov 2015 builds.
In our last post we had seen how to stop OneDrive Sync in Windows 10 which explains the concept
of disabling OneDrive sync in Windows 10 without any software..
This post is a continuation of the last post, which means even though we had hided OneDrive from
Windows 10 but,it will still appear on File Explorer. So, this post shows how to hide OneDrive
from File Explorer in Windows 10.
Do you need any software ?
No, you dont need to download software to hide OneDrive in file explorer of Windows 10, just
follow the below steps..
How to hide OneDrive icon in File Explorer in Windows 10...
1) First Open Registry Editor
[ Helpful link :How to Open registry editor in Windows 10]
2) Navigate to the following...
HKEY_CLASSES_ROOTCLSID{018D5C66-4533-4307-9B53-224DE2ED1FE6}
3) Now, on your right pane, you can find an item named
System.IsPinnedToNameSpaceTree
4) Double click on it
5) You will see 1 in the value data field.
6) Delete the value 1 on the box
7) Now, the box will be empty Type 0.
8) Click on OK.
Thats it..
But, if you are using x64 Bit version of Windows 10
[ Helpful link : How to Find what version of Windows you are using]
then, do the following..
How to hide OneDrive icon from File Explorer in x64 version of Windows 10
1) First Open Registry Editor
[ Helpful link :How to Open registry editor in Windows 10]
2) Navigate to the following...
HKEY_CLASSES_ROOTWow6432NODECLSID{018D5C66-4533-4307-9B53-
224DE2ED1FE6}
3) Now, on your right pane, you can find an item named
System.IsPinnedToNameSpaceTree
4) Double click on it
5) You will see 1 in the value data field.
6) Delete the value 1 on the box
7) Now, the box will be empty Type 0.
8) Click on OK.
Like this you can hide OneDrive on any Windows 10 Laptop and Windows 10 desktop.
Hope it is helpful..
Are you a beginner to Windows 10 ?? then here is a chance to get free Windows 10 related posts
everyday, just follow us on social media.subscribe to our Email Posts or YouTube channel (Links are
on the right pane)and learn new things..
Thats the end of this post..
Click to read all basic tutorials..
see in this post - Works on Windows 10 Creators Update, Windows 10
Anniversary Update, and other editions of Windows like Windows 10 earlier builds like Aug 2015
and Nov 2015 builds.
In our last post we had seen how to stop OneDrive Sync in Windows 10 which explains the concept
of disabling OneDrive sync in Windows 10 without any software..
This post is a continuation of the last post, which means even though we had hided OneDrive from
Windows 10 but,it will still appear on File Explorer. So, this post shows how to hide OneDrive
from File Explorer in Windows 10.
Do you need any software ?
No, you dont need to download software to hide OneDrive in file explorer of Windows 10, just
follow the below steps..
How to hide OneDrive icon in File Explorer in Windows 10...
[Video Tutorial]
1) First Open Registry Editor
[ Helpful link :How to Open registry editor in Windows 10]
2) Navigate to the following...
HKEY_CLASSES_ROOTCLSID{018D5C66-4533-4307-9B53-224DE2ED1FE6}
3) Now, on your right pane, you can find an item named
System.IsPinnedToNameSpaceTree
4) Double click on it
5) You will see 1 in the value data field.
6) Delete the value 1 on the box
7) Now, the box will be empty Type 0.
8) Click on OK.
Thats it..
But, if you are using x64 Bit version of Windows 10
[ Helpful link : How to Find what version of Windows you are using]
then, do the following..
How to hide OneDrive icon from File Explorer in x64 version of Windows 10
1) First Open Registry Editor
[ Helpful link :How to Open registry editor in Windows 10]
2) Navigate to the following...
HKEY_CLASSES_ROOTWow6432NODECLSID{018D5C66-4533-4307-9B53-
224DE2ED1FE6}
3) Now, on your right pane, you can find an item named
System.IsPinnedToNameSpaceTree
4) Double click on it
5) You will see 1 in the value data field.
6) Delete the value 1 on the box
7) Now, the box will be empty Type 0.
8) Click on OK.
Close the Window.
Thats it..
Like this you can hide OneDrive on any Windows 10 Laptop and Windows 10 desktop.
Hope it is helpful..
Are you a beginner to Windows 10 ?? then here is a chance to get free Windows 10 related posts
everyday, just follow us on social media.subscribe to our Email Posts or YouTube channel (Links are
on the right pane)and learn new things..
Thats the end of this post..
Click to read all basic tutorials..
Available link for download
Subscribe to:
Posts (Atom)